AERODYNAMICS
The challenge in explaining aerodynamics for glider pilots is to provide
the information needed to fly safely and efficiently without overloading
the student with complex theories. Meeting this challenge involves
using analogies and simple explanations that convey the essential information.
Some of the traditional ways of doing this have been questioned recently
as perhaps going so far that they are actually untrue. (See
http://www.informatik.uni-frankfurt.de/~plass/MIS/mis6.html and http://
www.avweb.com/articles/liftsuck/index.html).
We will try to avoid that kind of error here, but also include traditional
references when they relate directly to the FAA knowledge tests.
VECTORS
It is impossible to understand or explain aerodynamics for pilots without
using vectors. The term frightens some pilots, but it need not.
What follows is an explanation of vectors for shoe salesmen; engineers
may skip ahead if they like.
A vector is just an arrow, drawn to represent something that has
magnitude and direction. All our aerodynamic vectors will represent
forces. The magnitude of a force in the U.S. and a few other backward
countries is measured in pounds. Usually, we are interested only
in the relative magnitude of forces, so the unit of measure is not important
in most cases. The length of the arrow represents the magnitude of the force.
The direction that the force acts is shown by the direction that the arrow points.
Vectors are useful when we want to know the effect of combining two forces.
When the two forces act in the same direction, we really don't need vectors
to know their combined effect.
If you weigh 170 pounds and your dog weighs 20 pounds, even a shoe
salesman knows that if you get on the scale holding your dog, it will
read 190 pounds. The force vectors for your weight and for your dog's weight
both act downward on the scale, and we simply add them.
We do need vectors when we want to know the combined effect of two
forces that act in different directions.
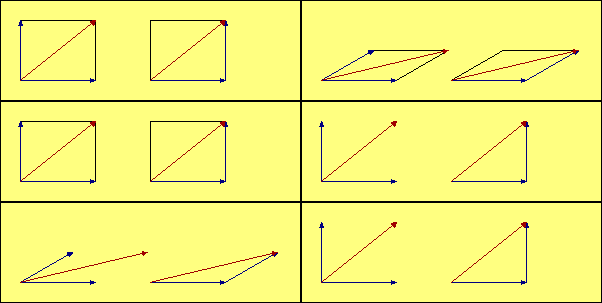 In our illustrations, the red vector represents the combined effect
of the two blue vectors. We add the blue vectors by drawing a
parallelogram (in most of our aerodynamic examples it is also a rectangle) with the two
blue forces represented by the two blue sides. The red vector is the diagonal of
the
parallelogram, and its magnitude and direction represents the
combined effect of the two blue vectors. The mathematical term
for the red vector is that it is the "resultant" of the blue forces.
In many cases it is useful to draw the two blue vectors originating at the same
point, as shown in the examples on the left. Two aerodynamic forces acting through the same
point is a good example of this type of display. In other cases, where the subject may be
distances or speeds, it may be better to show the vectors
as sequential lines, as illustrated on the right. In that case the blue vectors are like the sidewalk
you should be walking on, and the red vector is taking the shortcut. Both get
you to the same place. Since opposite sides of a parallelogram
are parallel and equal in length, the resulting diagonal is the same whether we
choose a common starting point or a sequential start for the blue vectors.
The black lines are there just to complete the parallelogram, but they add no information
to the illustration, so they can be omitted if that improves the picture by removing clutter.
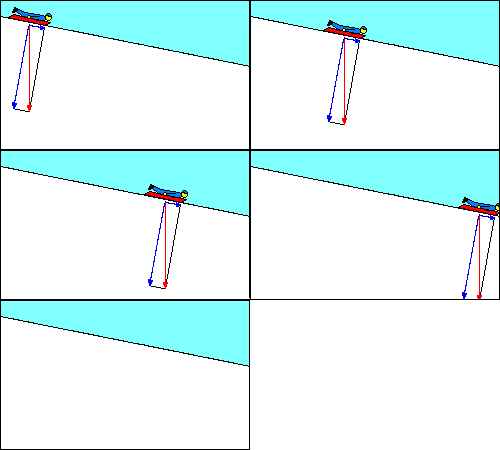 |
Sometimes, we want to know the "components" of a single force along two
different axes, or directions. The force causing your sled to move down the
hill is the component of its weight acting parallel to the slope.
The red vector represents the weight of the loaded sled (gravity force) acting
straight down. The blue
vectors represent its force components parallel and perpendicular to
the slope. Now
you should be able to answer the test question about what force
provides the forward movement of a glider. |
AIRFOILS
The Soaring Flight Manual Glossary defines an airfoil as "Any part of an
aircraft (primarily the wing and tail surfaces) that deflects the air through
which it moves to produce a desired reaction"(7). This definition correctly
reflects the fact that in practical operation the airfoil moves through the
air. In some discussions of airfoils it is more convenient to describe their
interaction with the air as if the airfoil were stationary with the air moving
past it, as in a wind tunnel. In either case the term "relative wind" is used
to describe the relative motion of the air opposite to the direction of motion
of the airfoil.
Glider airfoil cross sections vary from the complex curved surfaces of high
performance wings to the "barn door" cross-section of an SGS 2-33 horizontal
tail surface. All of them "produce a desired reaction by deflecting air",
although some shapes are much better than others at doing so.
The term "reaction" as used here refers to Newton's third law of motion:
"Whenever
one body exerts a force on a second body, the second body reacts on the first with
a force opposite in direction but equal in magnitude." With respect to an airfoil
that says if the airfoil pushes air downward, the air pushes the airfoil upward.
While it is easy to see that the lower surface of a wing deflects air
downward, it is not so obvious that the air flowing over the top of a wing also
curves downward behind the wing. In fact, the stream of deflected air extends
some distance above the wing as well as below.
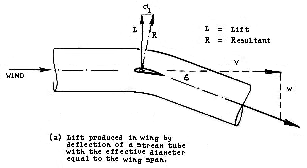 |
Sighard Hoerner, author of the "bible" on drag, has this to say about lift:
"The lift produced by a finite-span airfoil, such as a plate for example, or an
airplane wing, can physically be understood as the upward reaction to a
downward deflection of a tube or cylinder of fluid having a diameter equal to
the span of the lifting element."
(16)
Of course the boundaries of the actual "cylinder" of air are not as sharply
defined as Hoerner's illustration shows them to be, but the concept may be
helpful in understanding how a glider airfoil performs its function.
|
It is also true that the relative wind is deflected upward ahead of the wing,
much like the bow wave ahead of a ship,
but that can be ignored for our purposes, since the net deflection results in
downwash behind the wing.
FORCES ACTING ON AN AIRFOIL
The air flowing past an airfoil exerts forces on it that are sometimes described
in terms of Bernoulli's Theorem or Bernoulli's Principle:
"Bernoulli's Principle states in part that 'the internal pressure of a fluid
decreases at points where the speed of the fluid increases.' In other words, high
speed flow is associated with low pressure, and low speed flow with high pressure."
(8)
Since the air flowing above a wing is moving faster than that flowing beneath it,
its pressure is less and an upward force is exerted on the wing. In his classic
"Stick and Rudder" published more than sixty years ago, Wolfgang Langewiesche
says,
"Bernoulli's Theorem doesn't help you the least bit in flying. While it is no
doubt true, it usually merely serves to obscure to the pilot certain simpler, much
more important, much more helpful facts."
(17)
|
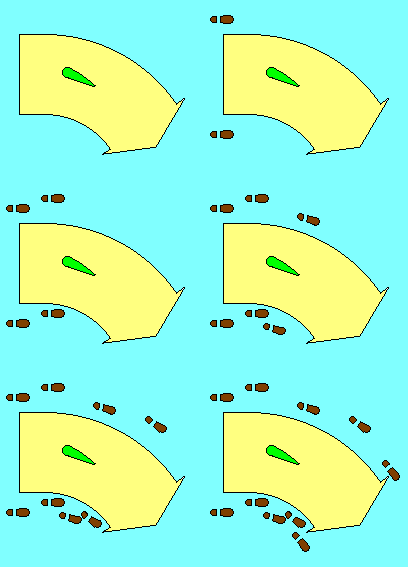
Perhaps a simple analogy can be used to reconcile Bernoulli and the simpler
"reaction to deflected air". When a marching band changes direction of travel,
those on the inside of the turn take shorter steps and those on the outside take
longer steps. Similarly, when an airfoil deflects the relative wind, air on the
outside of the "turn" speeds up and that on the inside slows down, which according
to Bernoulli's Theorem will be accompanied by lower pressure in the faster air and
higher pressure in the slower air. |
|
LIFT AND DRAG
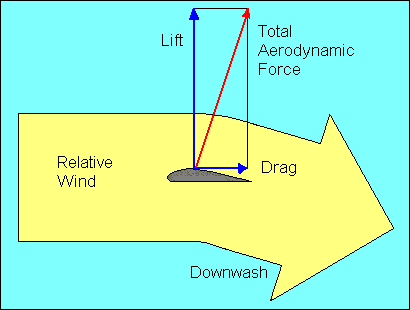 By now the reader probably has detected the author's slight bias against
Bernoulli's Theorem as an appropriate explanation for how an airfoil develops
lift. However, it still appears as the correct answer for several knowledge test
questions. Therefore, if the question is concerned with what is happening above
the wing, the correct answer will be Bernoulli. If the question relates to action
below the wing the answer will be something about deflection of air (Newton).
The pressure distribution on the airfoil is complex and of concern to aircraft
designers. Fortunately for pilots, the aerodynamic forces on the airfoil can be
combined to a single force inclined to the relative wind. We don't have a name
for the total force acting on the airfoil, but we do have names for its components
parallel and perpendicular to the relative wind. They are "drag" and "lift",
respectively.
Glider pilots should recognize two different meanings for the term "lift",
depending on the context in which it is used. Aerodynamic lift, as used here,
is the force on an airfoil perpendicular to its flight path, but glider pilots
also refer to rising air as lift.
PARASITE DRAG
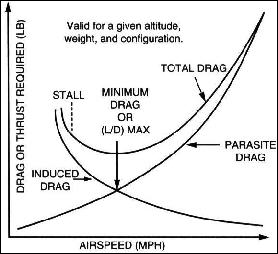 |
We should note that drag comes in two varieties. Parasite drag is the resistance
offered by the air to anything moving through it. Parasite drag of a modern
sailplane wing is very low, but when the drag of the rest of the aircraft is
added to it, the total is significant, particularly at high speeds since parasite
drag increases with the square of speed. (i.e. double the speed and parasite
drag increases four times.)
Parasite drag can be further classified into form drag, skin friction, and
interference drag. Glider form drag is reduced by making the frontal area of all
parts as small as practical. Skin friction is reduced by reducing the surface area.
Interference drag occurs where two parts join, such as the wing and fuselage, and
is reduced with fairings to streamline the intersection.
|
INDUCED DRAG
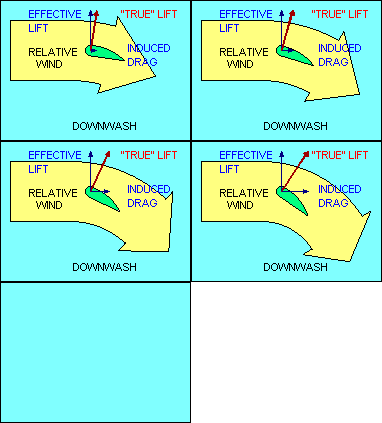 The other kind of drag is induced drag and is a by-product of the generation of
lift. Even if parasite drag were reduced to zero, the aerodynamic force on a
wing deflecting the relative wind would not be perpendicular to the direction of
flight, and the greater the wind deflection the greater the deviation of that
force from perpendicular. Sometimes it is helpful to describe the total
aerodynamic force (excluding parasite drag) as "true lift" perpendicular to
the "average" relative wind. This explanation recognizes that the relative wind
is deflected by the airfoil and its direction after deflection, called "downwash",
is no longer parallel to the flight path. Thus its "average" direction lies
somewhere between the flight path and the downwash angle.
In this explanation, the component of "true lift" perpendicular to the flight
path is called "effective lift" and the component parallel to the flight path is
induced drag. This explanation introduces new definitions of "lift" and "relative
wind" which may be confusing to some students. In all other uses of these terms
in this document, "lift" is defined to be perpendicular to the flight path and
"relative wind" is parallel to it. In any case, it follows then that induced
drag, the aerodynamic force component parallel to the flight path, increases as
the amount of deflection of the relative wind increases.
CHORD, CAMBER AND ANGLE-OF-ATTACK
 There are two ways to increase the degree of deflection of the relative wind, and
they require defining three more terms. A straight line drawn from the airfoil
leading edge to its trailing edge is the "chord line". A curved line drawn between
the same two points and midway between the upper and lower surface of the airfoil
defines its "mean camber", often simply called "camber". If the term camber
includes the modifiers "upper" or "lower" it is referring to the curvature of the
upper or lower surface of the wing. The angle between the chord line and the
relative wind is called the "angle of attack". Increasing the angle of attack or
increasing the camber increases the degree to which air is deflected by the
airfoil, and thus increases both lift and induced drag for a constant airspeed.
Angle of attack should not be confused with "angle of incidence", which refers
to the angle formed by the chord line and the longitudinal axis of the aircraft.
Angle of incidence is fixed; the pilot controls angle of attack.
 |
GROUND EFFECT
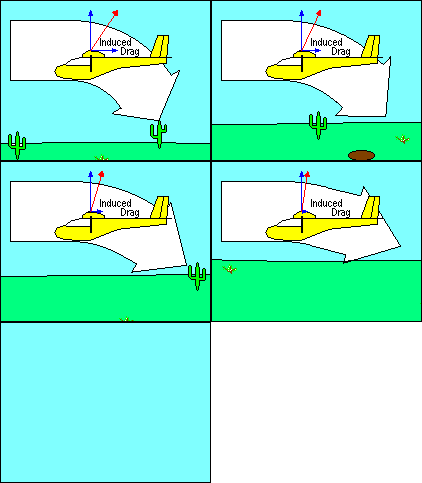
The fact that induced drag is directly related to the deflection of the relative
wind is the reason for an improvement in glider performance near the ground called
"ground effect". As a glider descends below an altitude approximately equal to one
wingspan, the interaction of the deflected air and the surface results in a
reduction in the angle to which the relative wind is deflected with a
corresponding reduction in induced drag. |
ANGLE-OF-ATTACK VS SPEED
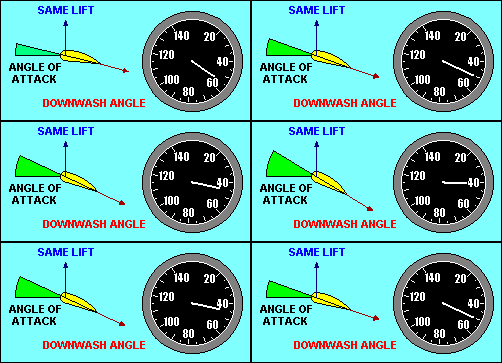 In wings level, unaccelerated flight the total lift force is essentially equal
to the weight of the aircraft. We will defer until later a more complete
discussion of forces acting on the glider in flight. For now we need only
recognize that the lift force depends on the angle through which the relative
wind is being deflected (downwash) and the rate at which air is moving past the
airfoil. The same lift force can be created by deflecting a lot of air through
a small angle or a little air through a large angle. If we assume camber to be
fixed, the angle of deflection of the relative wind depends on the angle of
attack, and the amount of air moving past the airfoil depends on the airspeed.
Thus to keep lift constant we must associate high speed with low angle of attack
and low speed with high angle of attack.
Remembering that parasite drag increases directly with the square of speed while
induced drag varies inversely with the square of
speed, we can see that total drag is high both at very
low speeds and at very high speeds and reaches a minimum somewhere in between.
The speed where this occurs is where parasite drag and induced drag are equal,
and it is the most efficient speed for the aircraft in an aerodynamic sense,
although it may not be optimum for any specific flight objective.
TRAILING VORTICIES
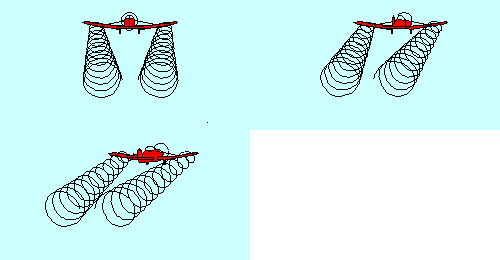 With all those aircraft up there deflecting air downward you'd think there
wouldn't be any left except at the surface. That isn't true, of course, because
the deflected air returns more or less to its original position after passage of
the airfoil. In fact, even as the air is being deflected downward by a wing, it
is escaping around the wing tips in an attempt to return to its original position,
creating "trailing vortices", which resemble little tornadoes coming backward
from the wing tips. They are the main constituents of "wake turbulence", sometimes
incorrectly called "prop wash". It occurs behind every airfoil that is generating
lift and can represent a significant safety hazard when caused by a large
airplane. Since it is a direct result of the air being deflected, it is greatest
when deflection is greatest, i.e. when the aircraft is heavy and slow.
Glider pilots utilizing aero tow find that flight in the wake of the towplane
is possible but not desirable.
STALL
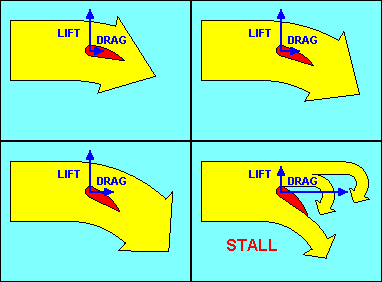 Before we leave the discussion of airfoils, we should examine what happens if we
continue to increase angle of attack. As you might expect there is some point
where the relative wind will no longer follow the sharply curved path that the
airfoil is trying to force it to follow. It is not unlike a racecar that
hurtles off the track while trying to negotiate a too sharp curve. The relative
wind breaks away from the airfoil, accompanied by a relatively abrupt increase in
drag and a similar decrease in lift. This action is called a "stall" and is
dependent only on the angle of attack. Unlike the racecar, speed has nothing to
do with it, but since gliders usually have airspeed indicators but not angle of
attack indicators, we recognize "stall speed" as that speed at which a glider
gradually slowing down with wings level reaches the critical (stalling) angle of
attack. It is important to remember that stalls can occur at any airspeed
and in
any attitude, even though they frequently are practiced with wings level and nose
high.
The FAA isn't likely to ask about it, but a curious student may want
to know why graphs depicting coefficient of lift versus angle of attack
typically show a much gentler stall than the one experienced in the
glider. The short answer is that the graphs are made from data
collected from a model in a wind tunnel while the student's view is
from a glider in the air. In the wind tunnel it is possible to hold
constant all the factors other than the ones you are trying to evaluate.
As a result, the graph shows coefficient of lift increasing linearly
with angle of attack until it nears the stall. There it changes to a
gentle curve that turns back down, with coefficient of lift
decreasing as angle of attack increases, usually at a faster
rate than it increased on the front side of the curve, but not as
quickly as it seems in the glider.
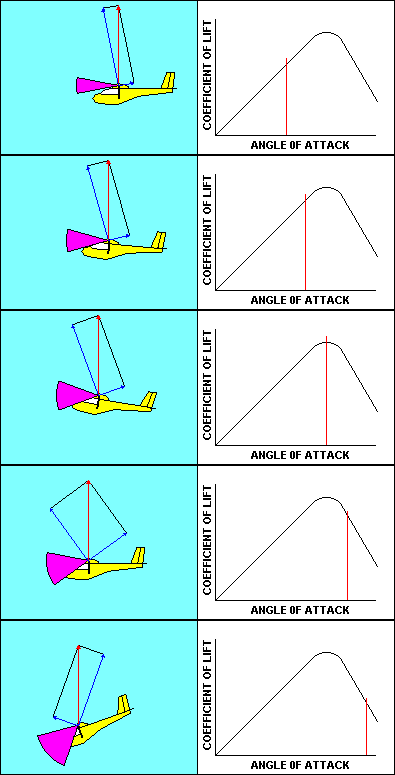
As the glider approaches a stall the angle of attack and the
corresponding coefficient of lift both increase pretty much the way
you would expect them to, based on the graph. Speed is decreasing so
that the aerodynamic resultant of lift and drag remains equal to the
glider weight. Once the critical angle of attack is reached, the
coefficient of lift starts to diminish and there is no offsetting speed
increase, so lift decreases. The glider starts to fall, and that causes the
direction of the relative wind to change. That causes an increase in
angle of attack that further reduces the coefficient of lift. That
makes the glider fall faster, increasing angle of attack, etc, etc.
The result is that the glider in actual flight moves very rapidly down
the already steeper back side of the curve. The gentle stall of the
wind tunnel becomes an abrupt change in glider performance that can
be fatal at low altitude.
FORCES ON THE GLIDER IN STRAIGHT FLIGHT
We have discussed forces acting on an airfoil. Now let's look at the forces
acting on the whole glider.
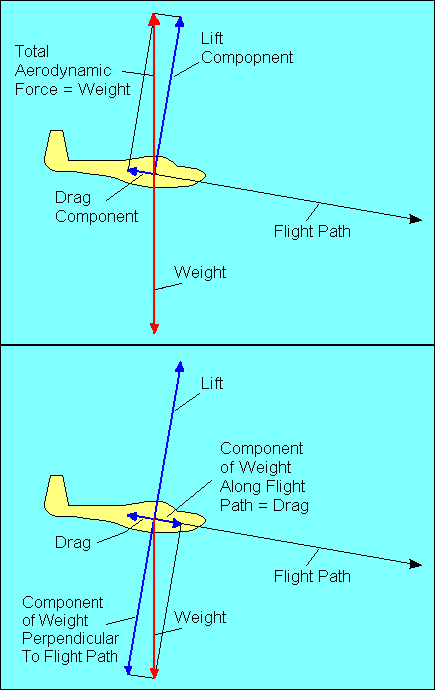 |
In straight flight at constant speed the forces on the glider are balanced. Since
gravity, the weight of the glider, acts straight down, it must be offset by an
equal aerodynamic force straight up. This total aerodynamic force is the sum of
all the aerodynamic forces acting on the glider and has no name. Instead, as we
did with airfoils, we resolve this force into its components parallel and
perpendicular to the flight path and call them drag and lift, respectively.
For
airplane pilots used to seeing drag offset by thrust, we could show that weight
has a force component along the glide path equal to drag and a perpendicular
component equal to lift. In either case the forces are balanced, but the former
explanation will be used in the following discussion.
|
GLIDE RATIO
The angle at which the glider descends is usually called its "glide ratio",
numerically equal to the horizontal distance it travels divided by the vertical
distance it travels in the same time. In the following discussion we mean "glide
ratio" relative to the air mass through which the glider is flying. "Glide Ratio"
with respect to the ground (generally of much greater interest to the pilot in
actual flight) is affected by both horizontal and vertical movement of the air
mass. The explanation here is valid with respect to the ground only in "still air"
conditions.
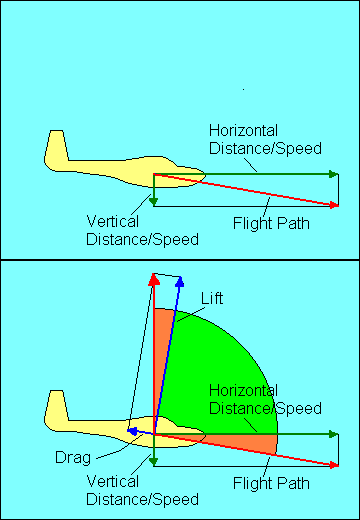 If a glider travels 20 feet forward for each foot it descends, it has a 20 to 1
glide ratio. This relationship also applies to speed since there is no significant
difference in horizontal speed and the speed along the actual glide path. Thus a
glider flying at 40 knots airspeed and descending at 2 knots vertical speed also
has a 20 to 1 glide ratio.
Once again we use the graphic vector analysis technique and show that the glide ratio
is numerically equal to the ratio of lift to drag. Either of the brown angles, when
added to the green angle, equals 90 degrees. Therefore, the brown angles are equal.
The lift/drag ratio is a measure of the upper brown angle and the glide ratio is
a measure of lower brown angle. Thus the lift/drag ratio is
numerically equal to the glide ratio. (When glider pilots say "L over D" they
are referring to this ratio and are not trying to yodel.) This means that a 1,000-pound
glider flying at a 20 to 1 glide ratio is experiencing a total drag of 50
pounds. We have assumed here as we did with speed that the difference between
lift and weight is negligible so long as the angles are small. Even at a 10 to 1
glide ratio the lift required to support a 1,000-pound glider is 995 pounds, a
difference of only one half of one percent. The remaining 5 pounds is supplied
by the vertical component of drag.
GLIDER AXES OF MOTION
 |
| LONGITUDINAL | LATERAL | VERTICAL |
| AXIS | AXIS | AXIS |
| ROLL | PITCH | YAW |
Our experience moving about on the ground only required turning right and left. In
the air we have two additional degrees of freedom. We define these in terms of
three axes and the motion of the aircraft about them. The "longitudinal" axis
runs from the nose to the tail of the aircraft and motion about it is called
"roll". The "lateral" axis runs from wing tip to wing tip and motion about it
is called "pitch". The "vertical" axis is perpendicular to both the others
(note that it is really "vertical" only in level flight) and motion about it
is called "yaw".
All three axes intersect at the center of gravity (CG) of the glider.
STABILITY
Stability, the tendency to return to the original position after being disturbed,
must be provided for all three axes of the aircraft. When we use the term
"stability" here we mean "positive static and dynamic stability". That sounds
more ominous than it really is. "Static stability means that if the airplane's
equilibrium is disturbed, forces will be activated which will initially tend to
return the airplane to its original position."
(8)

Stability can be illustrated by the old "lug nut and hubcap rule", which originated
back in the days before wheel covers and when changing a tire was part of learning
to drive. If the lug nuts are placed in the hubcap with its open side up, the
lug nuts tend to return to the center when they are disturbed. That is positive
stability. If you place the lug nuts on the rounded top of the hubcap, they will
roll off with the slightest provocation. That is negative stability. If you
already lost the hubcap and must place the lug nuts on the ground, they tend to
stay pretty much anywhere you put them. They neither tend to return to a more
stable place nor move farther away from it. That is neutral stability.
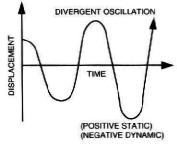 In our example of positive static stability the lug nut overshot the center of
the hubcap before it started back the other way. Each time it did this, however,
the amount of overshoot was less until it finally stopped in the center. That is
an example of positive "dynamic" stability. If the overshoot had grown larger
each cycle until the lug nut escaped the hubcap and disappeared, that would
have been an example of positive static stability with negative
dynamic stability. Lug nuts don't do that but aircraft can.
An example might be "flutter", where a component of the aircraft fails due to rapid uncontrolled oscillation.
FLUTTER
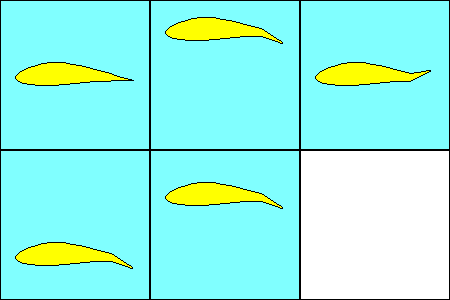 In our illustration an airfoil with an attached control surface, such as an aileron, is displaced upward by a gust. Because the center of gravity of the control surface is aft of its hinge point, the surface lags behind the airfoil as it rises. This downward deflection of the control surface increases the upward aerodynamic force on the airfoil and forces it even higher. If this example represented a wing, the wing would bend upward until its resistance to bending equaled the upward force. Then the wing would start back down and the aileron would deflect upward, again due to its cg location aft of the hinge point. Now the aerodynamic effect of the deflected aileron is adding to the downward force. The whole process reverses again when the airfoil reaches its lowest position, and it continues to flutter up and down until it departs from the aircraft. The chances of this happening can be greatly reduced if not eliminated by placing counterweights on the other side of the control surface hinge line to move its center of gravity near the hinge.
Flutter is usually associated with high true airspeed.
"Flutter below red-line speed can be caused by looseness in control cables,
connections, hinges, or play in the wing or empennage attachments, or even by
the pilot's action."
(12)
Although there is interaction between stability about different axes, we will
describe the primary contributor to stability for each axis as if they were
independent.
DIRECTIONAL STABILITY
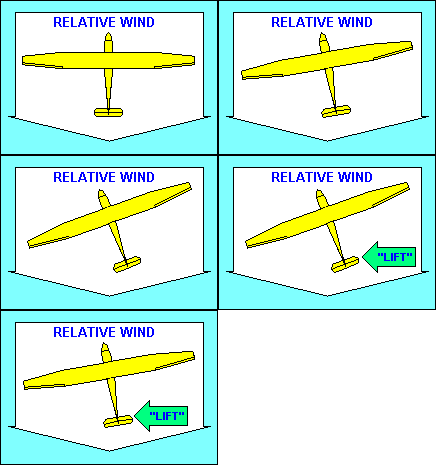 |
"Directional" stability is provided about the vertical axis by the vertical
tail surfaces. They act essentially the same way feathers on an arrow do, to
make the aircraft point in the direction it is moving (i.e. into the relative
wind). The tail surfaces are airfoils and produce a "lift" force when they are
inclined to the relative wind, just as the wing does. In this case the force is
horizontal and pushes the glider tail back into alignment with the relative wind.
|
LATERAL STABILITY
"Three factors that affect lateral stability are: Dihedral; Sweepback;
Keel Effect."
(8) All depend on the fact that an aircraft whose wings are not level
will tend to move in the direction of the low wing because lift is tipped in that
direction.
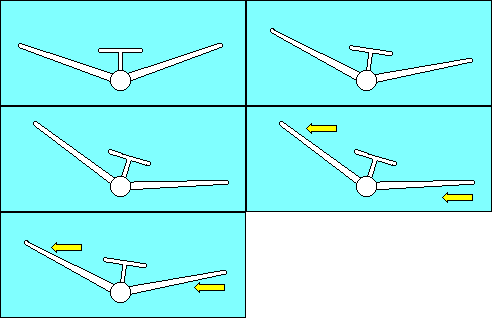 |
Dihedral, raising the wing tips above their roots, provides lateral
stability about the longitudinal axis. Aircraft movement toward the low
wing combined with dihedral increases the angle of attack of the low wing and
decreases the angle of attack of the high wing. This unequal lift on the wings
returns the aircraft to a wings level attitude. The location of the wing on the
fuselage contributes to its effective dihedral. A low wing aircraft may need as
much as 5o more dihedral than a high wing aircraft for the same effect.
|
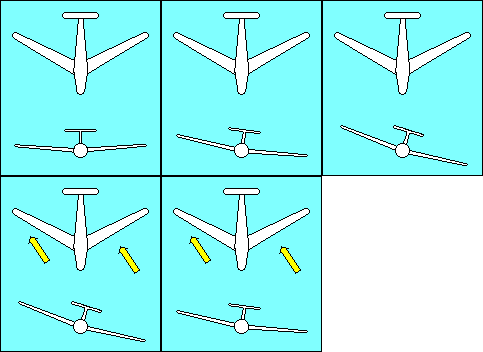 |
The upwind (low) wing of an aircraft with sweepback produces more lift than the
downwind (high) wing because lift depends on the airspeed perpendicular to the
wing's span-wise axis. The relative wind strikes the low wing more directly than
the high wing and the lift differential tends to return the aircraft to wings
level flight. Some gliders utilize forward sweep of their wings to get the
desired relationship between the center of gravity and the center of lift. When
they do so it is necessary to increase dihedral to compensate for the
negative effect of forward sweep on lateral stability.
|
"Keel" effect might better be called "rudder" effect. It refers to the rolling
moment caused by the effect of the relative wind on the side of the fuselage. A
significant part of the rudder area is above the center of gravity of the
aircraft, and the relative wind striking it tends to roll the aircraft back to
wings level flight.
LONGITUDINAL STABILITY
Directional and lateral stability are important but they are determined by the
designer of the aircraft and beyond the control of the pilot. Longitudinal
stability, about the lateral axis, is controlled by the pilot, so
it is even more important to understand what contributes to it and how to manage
it.
This involves understanding moments, another subject that may seem more complex
than it really is. A moment is a twisting action, and if you ever tried to loosen
a nut you applied a moment to it. A moment is measured by the product of a force
and a distance (called an arm in our examples). We will use pounds for force and
inches for distance, so a moment will be measured in pound-inches, representing
the product of multiplying the force times the arm. The moment you applied to the
nut could be increased by pushing harder on the wrench (increase the force) or
getting a longer wrench (increase the arm).
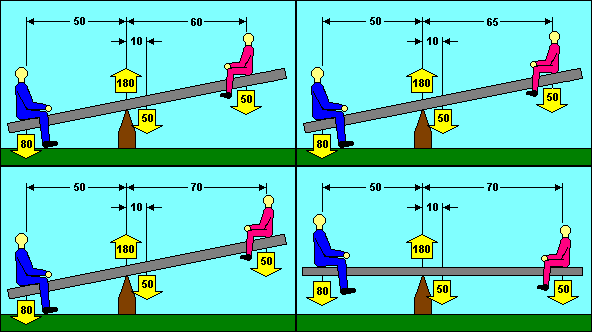 Longitudinal stability is often compared to a seesaw. Several of the knowledge
test questions use an illustration that looks a lot like a seesaw except that
boxes are substituted for boys. In our example, the seesaw is balanced when the
moments on each end are equal. We can do that with a big boy on the short end and
a small boy on the long end. The 80 pound boy times his 50 inch arm balances the
sum of the 50 pound seesaw times its 10 inch arm plus the 50 pound boy when he
moves out to 70 inches. (80 x 50) = (50 x 10) + (50 x 70). Note also that the sum
of the forces acting upward is equal to the sum of the forces acting downward.
(180) = (80 + 50 + 50).
A typical test question might ask how far to move the small boy to balance
the seesaw. You know that the left side total moment is 80 x 50 = 4,000 lb-in. To
balance the seesaw, the small boy needs to contribute 4,000 - (50 x 10 = 500 for the
seesaw) = 3,500 lb-in. Since he weighs 50 pounds, he needs an "arm" of
3,500 / 50 = 70 inches. He started at 60 inches, so he needs to move 10 inches
to the right.
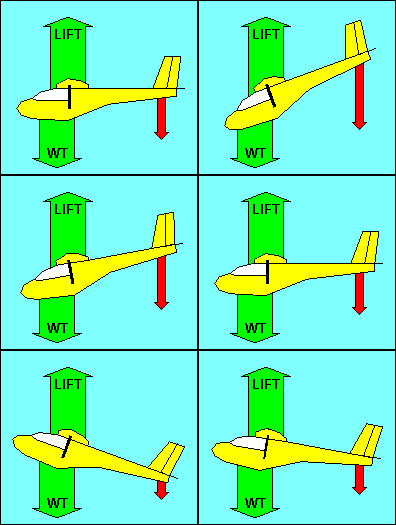 If we substitute a glider for the seesaw, we can see that the moment problem is
essentially the same. Instead of the large boy, we substitute the weight of the
loaded glider. We can treat that weight as if it were concentrated at the glider
"center of gravity" (CG). The fulcrum where the seesaw was balanced has been
replaced by the "center of lift" of the glider wing. Sometimes referred to as
the center of pressure, this is the point where the sum of the aerodynamic forces
on the wing can be treated as a single force. It is not the same as the
"aerodynamic center". The small boy is replaced by the aerodynamic force on the
glider's tail surfaces, shown in red in our illustration.
Common sense tells you that the force on the tail should be up like the wing. It
also tells you that the earth is flat. Neither is correct. In most flight
conditions, the force on the tail is down, and that is how we obtain longitudinal
stability.
In unaccelerated flight, the down force on the tail is just enough to balance
the glider CG. If the glider is pitched down it accelerates to a higher speed.
The higher speed produces a greater down force on the tail, which returns the
glider to the original pitch attitude. Similarly, if the glider is pitched up,
the lower speed reduces the tail force and allows the glider to return to its
original attitude. It is apparent then that the CG must be ahead of the center
of lift to obtain positive longitudinal stability. In fact, stability increases
as the CG moves forward and it decreases as the CG moves aft.
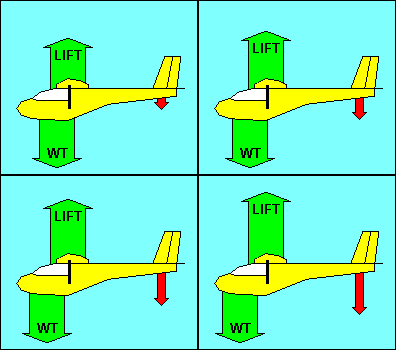 |
Note that movement of the CG must be accompanied by a change in the down force
on the tail to keep the moments balanced. Moving the CG forward increases its arm
and thus increases its moment. The arm of the tail surfaces is fixed, so to
balance the increased moment of the CG, the tail force must increase. That
increases the apparent weight that the wing lift must support.
"An airplane with forward loading is 'heavier'... than
the same airplane with the center of gravity further aft. ..This requires a
higher angle of attack of the wing, which results in more drag and, in turn,
produces a higher stalling speed.
With aft loading and 'nose-down' trim, the tail surfaces will exert less down
load, relieving the wing of that much wing loading and lift required to maintain
altitude. The required angle of attack is less, so the drag is less...
Theoretically, a neutral load on the tail surfaces in
cruising flight would produce the most efficient overall performance ...but
would also result in instability."
(11) |
The forward and aft limits of the CG are established by the designer and must not
be exceeded by the pilot when loading the aircraft. The aft limit is based on
stability and exceeding it can make recovery from stalls and spins difficult or
impossible. It also produces light control forces that may be difficult for the
pilot to handle. The forward CG limit is usually based on landing considerations
where the ability to raise the nose is essential.
WEIGHT AND BALANCE
As the preceding section indicated, the pilot has a responsibility to be sure
that the glider is within weight and balance limits. Calculating "weight and
balance" is easy for a glider because there are few variables. In practice it
is usually sufficient to consult a chart or placard to verify that the glider
is within acceptable limits, but pilots should understand the underlying
calculations even if they do not need to use them very often (maybe when they
take the practical test).
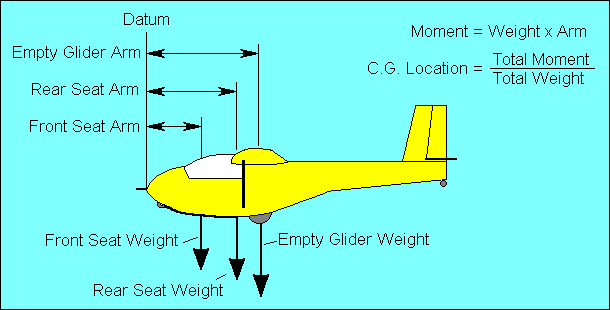
The acceptable range for the CG is specified as minimum and maximum distances from
an arbitrarily selected "datum" point, usually near the front of the glider. The
weight of the empty glider and its distance from the datum (called "arm") is
provided, as well as the distances ("arms") from the datum to each occupant.
Moments must be calculated for the empty glider and each occupant. If the sum of
these moments is divided by the total weight, the result will be the distance
from the datum to the loaded glider CG.
Some of the knowledge test questions involve adding or removing weights and
determining the effect on CG location. Although these can be solved by a complete
recalculation, the following formula can also be used:
       (Weight Added or Removed)          (Change in CG Location)
       -------------------------  =  -----------------------------------
          (New Total Weight)         (Distance Between Weight and Old CG)
For example: If the CG of a glider at 900 lbs is located at station 80, and
you add 100 lbs at station 70, then 100/1,000 = (Change in CG)/10. The change in
CG is 1, and since the weight is added ahead of the old CG, the new CG is
located at station 80 - 1 = 79.
If the weight changes are permanent the aircraft weight and balance records must be
revised to reflect the new empty weight and its arm and/or moment.
If the CG is within the specified limits the glider meets the "balance"
requirement, but still could be outside the "weight" limit. This maximum gross
weight limit is based on the structural strength of the glider. Pilots usually
sooner or later observe that the wings typically don't fall off an overloaded
glider. This should not be interpreted that weight and balance is just something
you need to know to pass a test. Overloading a glider uses up some of the safety
factor that was built into the glider to allow for stresses that can result from
maneuvering or gusts. Even if you are willing to take that risk, remember that
you are operating illegally and probably have invalidated your insurance.
GLIDER CONTROLS
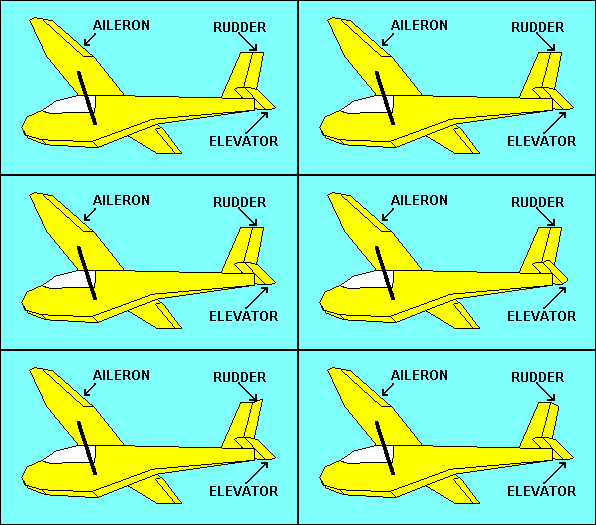 Stability of a glider is good because it allows pilots to scratch their noses or
get a drink from their canteens without losing control of the aircraft, but
frequently they want to cause the glider to do something opposing stability, like
turn. If stability were our only objective, airfoils would not need movable
surfaces such as ailerons on the wings, the elevator on the horizontal tail or the
rudder on the vertical tail. These provide for control of roll, pitch and yaw,
respectively. They achieve control by changing the camber of the airfoil to which
they are attached, which in turn changes the lift and drag of that airfoil.
A right aileron deflected downward increases lift for that wing, rolling the
glider to the left. Right rudder causes air to be deflected to the right,
resulting in a horizontal "lift" force on the tail to the left, yawing the nose
to the right. Up elevator increases the downward "lift" force on the tail,
pitching the glider nose up. Selecting the pitch attitude to which the glider
will return without the application of elevator control is accomplished with
pitch trim. In gliders this usually utilizes either an adjustable spring attached
to the elevator control mechanism or a small adjustable tab on the elevator
surface. When the trim tab is deflected downward aerodynamic forces push the
elevator up, which is equivalent to applying a backward force on the control
stick, either manually or with a spring type trim. The result is a pitch up and
stable flight at a lower speed.
Our illustration shows a common arrangement for the horizontal tail on an aircraft, in
which there is a fixed surface called the stabilizer and a movable surface called the elevator.
On some aircraft these are combined in an all-moving surface called a stabilator. V-tailed
aircraft combine the function of rudder and elevator in a pair of ruddervators. Horizontal
tail surfaces can be mounted at the top of the vertical tail as a T-tail, or midway up as
a cruciform tail, or even in front on a canard design.
FLAPS
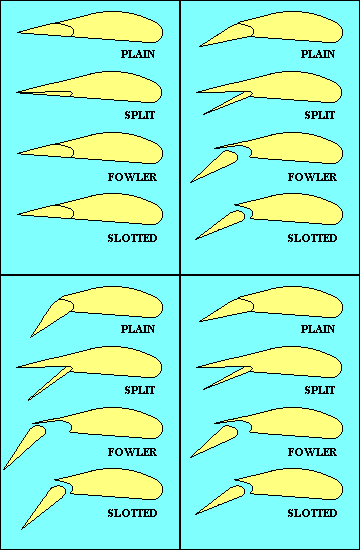 |
While we are discussing control surfaces we should also mention the flaps. Flaps come in
a variety of types, as shown in this illustration. Their purpose
is to change the camber of part of the wing and sometimes also to increase wing area.
Both increase lift for a given speed and usually also increase drag, but since lift has to be
equal to weight, the practical effect is to allow flight at a lower speed. The added drag
has the effect of reducing the glide ratio, useful in landing. Flaps generally reduce stalling
speed, another benefit when landing. That feature is also good when you need to fly slowly
as when following a slower aircraft in the pattern, or when you are thermalling.
In addition to flaps on the wing trailing edge, some aircraft also have flaps, slats or
slots at the leading edge. They increase camber and/or delay stall by providing a route for
higher-pressure air below the wing to add energy to the boundary layer of air on the upper surface.
|
It may be of interest, since it makes a good test question, to distinguish between stability, maneuverability, and controllability. Stability is the inherent quality of an aircraft to correct for conditions that disturb its equilibrium. Maneuverability is the quality that permits it to be maneuvered easily and withstand stresses imposed by maneuvers. Controllability is the capability to respond to the pilot's control with regard to flight path and attitude.
NEWTON ON GLIDERS
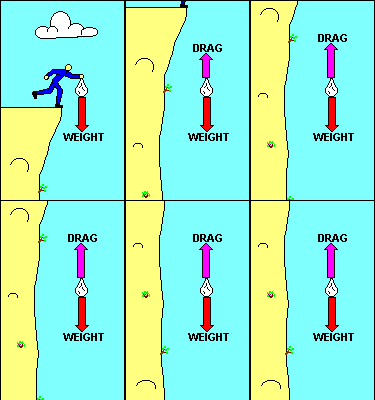 Before discussing the application of these controls to maneuvers, we should review
Newton's first and second laws as they apply to gliders. If the forces on a glider
in flight are balanced it will continue moving in a straight line at a constant
speed. We refer to this as a "steady state" condition. If the forces on the glider
are unbalanced it will move in the direction of the net force and accelerate until
the forces are again balanced. We refer to this condition as "transient", the
change from one steady state to another. Newton's laws apply to everything. If a
sick sack is dropped it will accelerate downward due to the unbalanced force of
gravity until air resistance builds a drag force equal to its weight. It then
assumes a steady state condition at that speed with weight and drag equal.
(Similarly, its initial horizontal speed, if any, decreases due to unbalanced
horizontal drag until both speed and drag are essentially zero.)
A more practical application of this principal is when a pilot
applies back-pressure on the stick. That increases the angle of attack and so
increases lift and induced drag. Lift, now greater than weight, accelerates the glider
upward. Drag, now greater than thrust, slows the glider. When the forces again
become equal, the glider will be in a shallower glide (assuming the operation is
conducted at a speed greater than the best glide speed) and at a lower speed.
TURNS
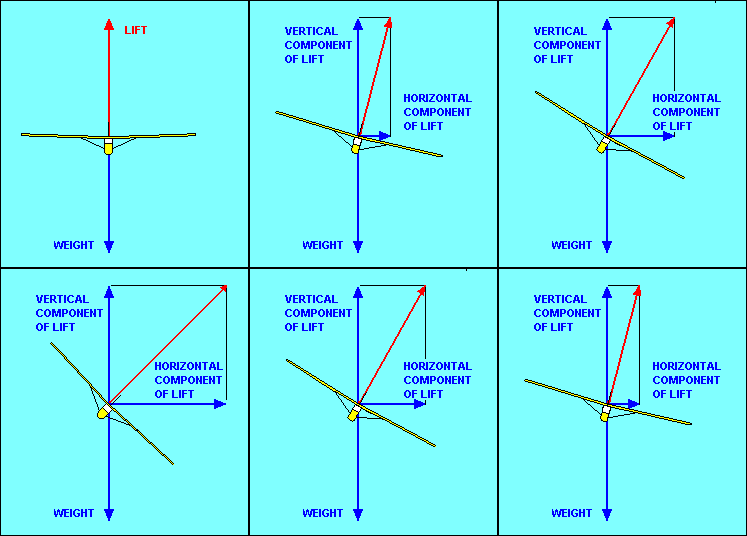 If we want to change the direction of flight (i.e. turn the glider) we must apply
a force in the direction we want to go. If we were driving a car we could point
it in that direction and the friction between the tires and the road would provide
the turning force unless we were driving on ice. Since air is even slipperier than
ice, pointing the glider in the new direction won't work very well. The strongest
controllable force we have in the glider is lift. In straight flight lift is
pointed straight up, when viewed from the front or rear. If we roll the glider so
that the lift is inclined to one side we have a horizontal component of lift to
act as the necessary force to change our direction of flight. Because the vertical
component of lift still needs to equal weight, the total lift, represented by the
red
vector in the illustration, must be increased. This usually is accomplished by
increasing the angle of attack but the glider left alone will do it by sacrificing
altitude for speed. "Sometimes during early training in steep turns, the nose
may be allowed to get excessively low resulting in a significant loss of altitude.
To recover, the pilot should first reduce the angle of bank with coordinated use
of rudder and aileron, then raise the nose of the airplane ..with the elevator."
(9)
The unbalanced force due to the horizontal component of lift
causes the glider to accelerate toward the low wing, but
turning involves yawing motion combined with this lateral movement. Here,
directional stability comes in to help. The glider really doesn't "like" to move
sideways and yaws to keep its fuselage more or less aligned with its direction of
travel. Note that turning does not require the rudder; a fixed vertical tail
will
provide the yawing action described here, but as we shall soon see, there are
rudder functions associated with turning efficiently.
Before leaving this description of turns we should review the relationship between speed, bank angle, and turn radius. One formula that relates them is: radius (ft) = speed (kts) squared divided by (11.26 times the tangent of the bank angle.) This indicates, for example, if you double the speed while maintaining the same bank angle, you increase the radius four times. That would also increase the circumference of the turn four times, and although the speed is doubled, it takes twice as long to complete a circle. Thus the turn rate (in degrees per second) is only half as much. To increase turn rate, bank more steeply and/or slow down. (ROT = [1091 times the tangent of the bank angle] divided by the speed) Of more interest to glider pilots circling in a thermal, the turn radius can be decreased the same way.
ADVERSE YAW
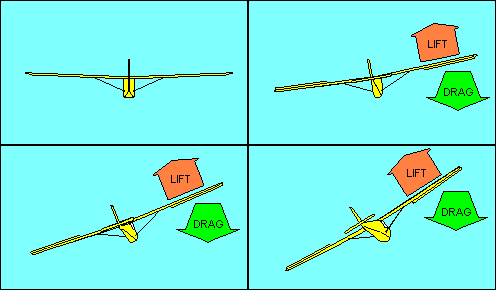 The turn is a more complex maneuver than the preceding description suggests.
While the glider is rolling into the turn (and also while it is rolling out) the
increased lift on the rising wing is accompanied by an increase in induced drag
which causes "adverse yaw", a yawing motion opposite from the intended turn
direction when rolling in. The only function of the rudder in turn
entry and roll out is to offset this adverse yaw. Our illustration shows banking
for a left turn without using rudder - the nose yaws right.
"If the nose starts to move before the bank starts, rudder is being applied too
soon. If the bank starts before the nose starts turning, or the nose moves in the
opposite direction, the rudder is being applied too late."
(9)
Adverse yaw is greater for
gliders than for most airplanes because the long wing span provides a longer
lever arm for the force to act through. It is usually
much more noticeable at low speeds because the wing is already operating at a high
coefficient of lift. The coefficient of induced drag varies with the square of
the coefficient of lift, so the same lift increase due to aileron deflection results
in greater adverse yaw at low speed than at high speed.
OVERBANKING AND YAW IN A TURN
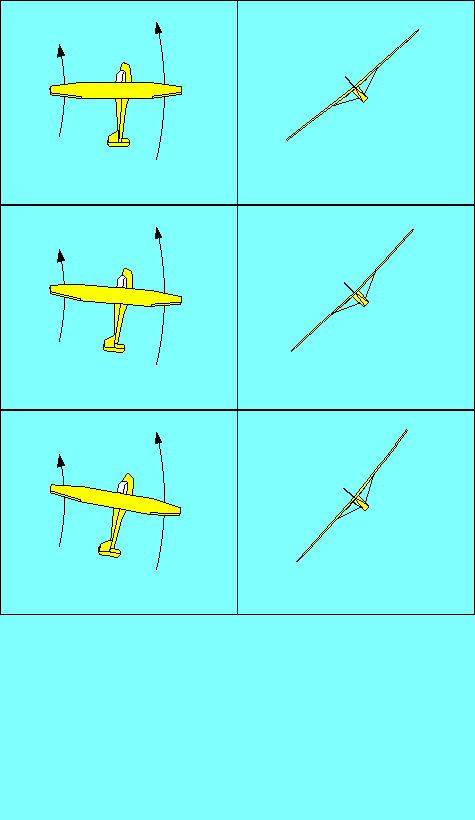 Once the turn is established the wing on the outside of the turn is traveling
faster than the one on the inside because it is traversing a larger circle in
the same time. Since both lift and drag increase with speed, they are greater
for the outside wing and result in an "overbanking tendency" and "yaw away from
an established turn", respectively. Note that this yaw is not the same as adverse
yaw, but it is corrected the same way, with rudder to keep the fuselage aligned
with the direction of flight.
Overbanking is corrected with aileron opposite the
direction of turn. Both these phenomena are much more evident in gliders than in
other aircraft because the glider's longer wings provide a greater speed
difference between the wing tips. They are a function of wingspan and turn
radius. The formula for turn radius in feet is:
r = V2 / (11.26 x Tangent of Bank Angle)
where V is speed in knots. Thus, turn radius varies with the square of speed.
Rate of turn, in degrees per second, increases with bank angle and decreases
with speed.
Since turn radius is affected by both bank angle and speed, overbanking and yaw away
from the direction of turn are
most obvious at relatively steep bank angles at normal speeds and at even shallow
bank angles at very low speeds.
When we discussed stability we noted that a well-designed aircraft tends to return
to wings level flight when disturbed about the longitudinal axis. This is just the opposite
of what happens in overbanking. When the opposing forces of stability and
overbanking are equal the aircraft remains in
a banked turn without aileron displacement. That is defined as a medium bank turn.
In a shallow turn stability dominates and the aircraft may need aileron in the direction
of turn to maintain the bank angle. In steep turns overbanking dominates and aileron opposed
to the turn is required. For most gliders, shallow and medium bank turns, by these
definitions, occur at very small angles.
LOAD FACTOR IN TURNS
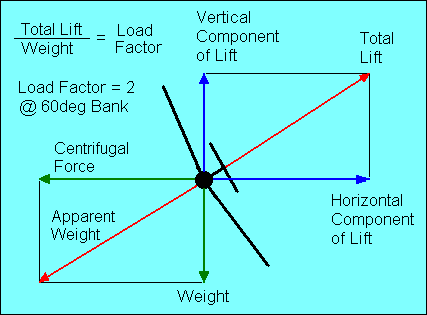
| We have shown that it is necessary to increase total lift when turning.
We can utilize the graphic vector technique to find that for a 60-degree bank,
the total lift must equal twice the weight of the glider.
The ratio of the total lift produced by the wing to the total glider weight is
called "load factor".
| 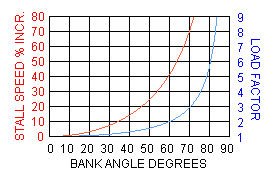 As shown in this graph, at an angle of bank of slightly more than 80o, the load factor exceeds 6.
The stall speed increases as the square root of the load
factor; at a 60-degree bank the load factor is 2 and the stall speed increases 41%.
All other performance speeds, which we will discuss later, are affected
similarly. Note that load factor depends only on bank angle; it is independent
of speed.
 |
CENTRIFUGAL FORCE, CENTRIPETAL FORCE, AND LIFT
An old trick, used by young men who had just learned to drive, was to make a sharp
right turn so the young lady beside them would press against them. Less
romantic observers would say it was only centrifugal force causing the lady to
snuggle. Perhaps a more accurate explanation is that the turning vehicle pressed
against the young man, who in turn pressed against the young lady, to cause all
of them to turn right. Once more we look to Newton for the answer. Indeed, turning
a car or glider or two amorous young people does require a force to be applied
in the direction we want to
turn. The generic name for that force is "centripetal force", and according to
Newton's third law, it will be accompanied by an equal but opposite reaction,
which we call "centrifugal force".
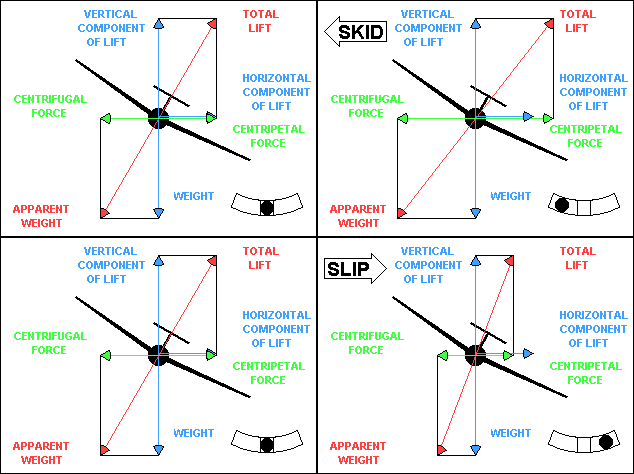
In a coordinated banked turn, centrifugal force is equal to the
horizontal component of lift. The resultant of centrifugal force and weight,
shown in red in the illustration, is the apparent weight of the glider, which
must be supported by total lift. If the turn is not coordinated, centrifugal force
will not be equal to the horizontal component of lift. However, it must be
equal to the centripetal force or Newton is wrong. The explanation is that the
glider fuselage contributes to centripetal force when the glider is slipping or
skidding in a turn. The fuselage, acting as a relatively inefficient airfoil when
it is inclined to the relative wind, produces a horizontal "lift" force that can
add to or subtract from the effect of the horizontal component of "wing" lift.
We defined "load factor" as the ratio of total wing lift to aircraft weight and
noted, for example, that a sixty-degree bank produces
a load factor of two. That is strictly true only in level flight, something a
glider cannot sustain. Since lift is slightly less than weight in straight,
gliding flight, the load factor in gliding turns is also slightly less than it
would be in level flight at the same bank angle. However,
that reduction is typically less than one percent.
Most gliders do not have "g" meters to measure load factor,
but the pilot should feel a significant
increase in "g" force in a steep turn. If not, then either the bank is not as
steep as the pilot thinks it is or the turn is not coordinated. A common error
for airplane pilots, unaccustomed to the need for rudder in an established turn,
is to slip in steep turns. The pitch and bank attitude look fine, but the yaw
string is displaced and there is little or no evidence of "g" force.
LOAD FACTOR VS AIRSPEED
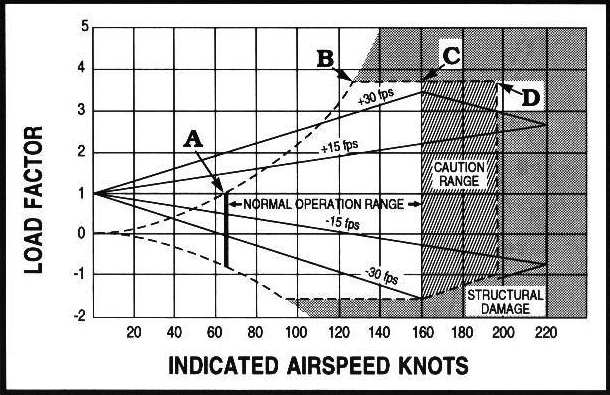
This diagram shows the relationship between airspeed and both positive and
negative load factors for a typical aircraft. We will limit our discussion to
positive load factors since they are the ones you are most likely to encounter
unless you are flying inverted. The curved dashed lines indicate the maximum
load factor possible for each speed. Point "A" represents the stall speed at one "g";
what we usually think of as stall speed. Point "B" is the maneuvering speed. It
occurs where the upper dashed line intersects the design limit load line
for the aircraft. In this case it is about 3.8 "g". The aircraft will stall before
it can reach any point above the dashed line, no matter how abruptly the controls
are applied.
Abrupt control input is not the only way that the angle of
attack can be suddenly increased. Vertical wind shear changes the direction of the
relative wind and can produce an abrupt increase in angle of attack just as if the
pilot pulled back on the stick. This possibility is covered in the chart by the
sloping lines labeled 15 and 30 fps. The chance of encountering a gust greater than
30 fps is slim, so until you reach point "C" a gust is not likely to overstress
the aircraft by producing a load factor greater than it was designed for.
At speeds greater than point "C" you really need to be flying in smooth air
where you are pretty sure you won't find a 30 fps or greater vertical gust.
That's why it's called the "Caution Range". Point "D" is the "Never Exceed Speed",
and it should not be approached except in smooth air.
SLIPS
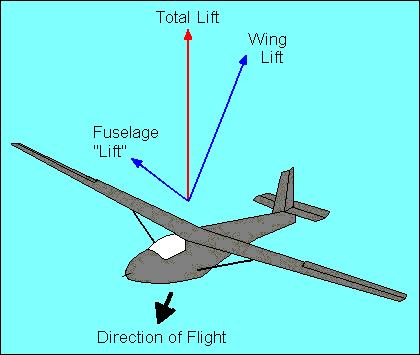 When the glider wings are level, lift and weight are essentially equal and
generally constant. If lift is fixed and the glide ratio is numerically equal to the
lift/drag ratio, we can change the glide ratio only by changing drag. One way to
increase drag is to slip the glider. We have just discussed slips in a turn, which
can be
useful, but straight-line slips are probably more common and have more applications.
We initiate a slip by lowering one wing, just as we do to initiate a turn. To prevent
the yawing part of a turn, we apply sufficient opposite rudder to achieve a straight-line
course. If you are wondering what happened to the horizontal component of lift,
it is offset by an equal but opposite horizontal "lift" force, created by the
fuselage, which is now at an angle to the relative wind.
Straight-line slips come in two varieties, although the glider doesn't know the
difference. In a sideslip the glider maintains its original heading and slips to one
side, usually to compensate for a crosswind. In a forward slip the glider maintains
its original course but changes its heading, usually to steepen its glide path.
"Normally, forward slips are performed with dive brakes or spoilers fully open."
(7)
SPIRAL DIVE
As bank angle approaches 90 degrees the load factor could exceed structural
limits of the aircraft unless the wing stalls first, due to the increase in
stall speed that accompanies an increase in load factor. Since the glider's
natural tendency is to increase speed by diving during a turn, an inattentive
pilot could allow the aircraft to enter a "high-speed spiral dive" in which the
glider's speed exceeds stall speed even at steep bank angles. The result easily
could be structural failure of the glider. The spiral dive is recognized by high
speed and high load factor (g force). Recovery requires leveling the wings
before carefully recovering from the dive to avoid overstressing the aircraft.
SPINS
If the glider stalls in a turn it could enter a spin, which looks a lot like a
spiral dive, but is significantly different. In a spin the wing is stalled and
the load factor is approximately equal to one, but one wing is stalled more than
the other, providing what is called "auto-rotation" about the longitudinal axis.
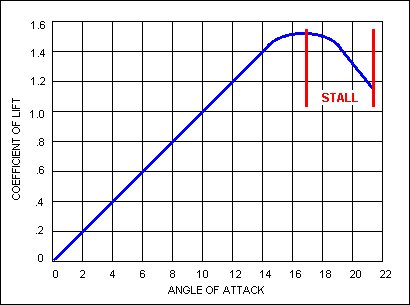 Wing lift is a function of angle of attack as shown in the accompanying
illustration. At normal values of angle of attack the coefficient of lift increases
with angle of attack. At values greater than the critical (stalling) angle the
coefficient of lift decreases as the angle of attack increases.
As the spinning glider rotates about the longitudinal axis the descending wing angle of
attack is increased, stalling it further. The rising wing angle of attack is
reduced, making it less stalled.
"If the airplane is slipping toward the inside of the turn at the time the stall
occurs, it tends to roll rapidly toward the outside of the turn as the nose
pitches down because the outside wing stalls before the inside wing. If the
airplane is skidding toward the outside of the turn, it will have a tendency to
roll to the inside of the turn because the inside wing stalls first. If the
coordination of the turn at the time of the stall is accurate, the airplane's
nose will pitch away from the pilot just as it does in a straight flight stall,
since both wings will stall simultaneously."
(9)
The glider usually spins with the nose low but if it has been loaded with the CG
far aft, it may develop a "flat spin" from which recovery may not be possible.
"In the absence of the manufacturer's recommended spin recovery procedures and
techniques, the following spin recovery procedures are recommended. 1-REDUCE
POWER; 2-POSITION AILERONS TO NEUTRAL; 3-APPLY FULL OPPOSITE RUDDER AGAINST THE
ROTATION; 4-APPLY A POSITIVE AND BRISK STRAIGHT FORWARD MOVEMENT OF THE ELEVATOR
CONTROL FORWARD OF NEUTRAL TO BREAK THE STALL; 5-AFTER SPIN ROTATION STOPS,
NEUTRALIZE THE RUDDER; 6-BEGIN APPLYING BACK-ELEVATOR PRESSURE TO RAISE THE NOSE."
(9)
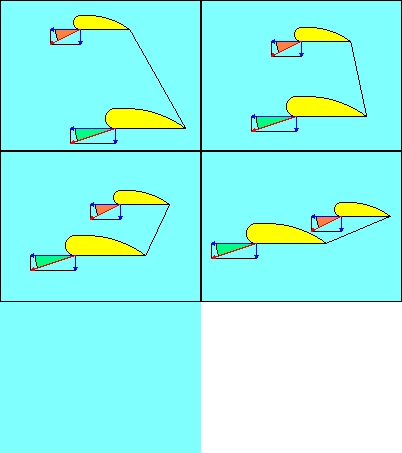 In this illustration the horizontal blue vectors represent horizontal motion
of the wing tips. The vertical blue vectors represent their vertical motion.
The red vectors are the resultants of the pairs of blue vectors and represent the
flight paths of the wing tips into the relative wind.
The use of rudder to stop rotation in a spin or to pick up
a low wing during a stall to prevent spinning is effective because the yawing
motion increases the forward speed of the low wing. Since the vertical speed of
the wing is unchanged, this reduces the wing angle of attack (shown in green). Just
the opposite happens for the high wing (shown in brown). Since the wings are stalled,
reducing
angle of attack increases lift, the reverse of the normal, unstalled relationship,
and increasing speed always increases lift. Use of ailerons to pick up a stalled
wing may actually have the opposite effect since the increase in camber tries to
bend the relative wind more just as increasing angle of attack does.
It should be noted that many aircraft incorporate "wash out" in their wings and
other design
techniques to cause the wing to stall first at the root so that aileron
effectiveness is preserved. For example, although an elliptical planform (the
shape of the wing when viewed from above) is the most efficient, a rectangular
planform offers better stall characteristics because it tends to stall first
at the wing root. However, use of rudder for roll control in stalls is
a good habit to apply in any aircraft.
Spin training is not required except for flight instructors, but many instructors
teach it to pilots anyway. Many trainers are difficult to spin, but spin entry
and recovery can be demonstrated by applying full rudder in the desired direction
of spin while holding full up elevator. Then execute the recovery as soon as the
spin is recognized.
"The objective of a cross-control stall demonstration maneuver is to show the
effect of improper control technique and to emphasize the importance of using
coordinated control pressures whenever making turns."
(9)
MANEUVERING SPEED
In contrasting spins and spiral dives we observed that we could not overstress
the aircraft if the wing stalled before it reached a limiting load factor.
The stall speed corresponding to the maximum allowed load factor is called
"maneuvering speed" and at this or lower speeds, abrupt control inputs will
result in a stall before the load factor reaches excessive values. This is an
appropriate speed limit in strong turbulence to avoid overstressing the aircraft.
Since stall speed increases as the square root of load factor, an abrupt pull up
from a dive can produce a stall as well as overstress the aircraft.
Maneuvering speed,
and all other performance speeds, varies with the weight of the aircraft. If only one value
is given in your aircraft manual, it probably is for maximum gross weight. Although
it may seem illogical, maneuvering speed is lower for weights below maximum. You
might think that it would be easier to break the wings off a heavy glider than a
light one. The explanation is that other parts of the aircraft, such as
the seat you are sitting on, are also designed for the maximum
allowed load factor. The lighter aircraft will respond to a given gust with a greater
load factor than the heavier aircraft, thus subjecting all components to a higher g force.
The solution is to fly slower if you are below maximum gross weight. If your manual
doesn't tell you how much slower, reduce maneuvering speed by half the percent you are below
maximum gross weight (i.e. If you are 20% below max weight, reduce maneuvering speed by 10%).
EFFECT OF DRAG ON GLIDE RATIO
Recognizing that lift essentially equals weight in straight flight then the
only variable affecting glide ratio is drag. To improve glide ratio we must reduce
drag. Induced drag can be reduced by increasing "aspect ratio" (wing span divided
by average chord). Parasite drag can be reduced by making glider components as
small and streamlined as possible. If we wish to steepen our glide path, i.e.
reduce the lift/drag ratio, we must increase drag. There are several ways to do
that; one, as we have already seen, is to establish a slip. It is obvious that a
fuselage creates more drag
when it is not aligned with the relative wind.
High drag devices such as drag chutes are effective at reducing lift/drag ratio,
but provide limited control. Spoilers and dive brakes can be incrementally
deployed and retracted, providing excellent glide path control. Note that
spoilers, so named because they spoil lift, actually steepen the glide path
through their effect on drag. The lift they spoil on one part of the wing must
be made up by the rest of the wing, since steady state flight requires that
lift equal weight.
Similarly, high lift devices, usually limited to flaps on
gliders, when used to steepen the glide path, do so because they increase drag.
They do allow lift equal to weight to be obtained at a lower speed (useful when
thermalling) and they usually lower stall speed, also. Positive flap deployment
is associated with slow speed, but some high performance gliders also provide
for negative flap deployment to improve performance at high speed.
Spoilers can also be utilized when the glider is on the ground, either parked or moving, to minimize the effect of strong winds.
GLIDER POLAR CURVE
The most frequently used way to vary glide ratio is by varying speed. Remembering
that induced drag increases at low speeds and parasite drag increases at high
speeds, we see that a glider flying very slowly or very fast has a relatively
poor glide ratio. If we plot sink rate versus airspeed for a glider we obtain a
curve called the glider "polar". The term "polar" comes from the fact that in its
purest form we would be plotting speed versus glide angle. Since the angles are so
small, we can get a more readable graph by converting to rectangular coordinates
and expanding the vertical scale. The resulting curve looks
a lot like the total drag curve turned upside down for obvious reasons.
If graphs look like way too much math for you,
maybe the following explanation will help.
Suppose we have four Schweizer SGS 1-26 gliders, identical
except for color. For our test, we will line them up and fly them
at the speeds and sink rates in the following table:
| Glider
| 
| 
| 
| 
|
| Airspeed
| 26 Knots
| 31 Knots
| 42 Knots
| 62 Knots
|
| Sink Rate
| 1.8 Knots
| 1.6 Knots
| 1.9 Knots
| 3.2 Knots
|
 |
If the four gliders start together and proceed in the same direction
at their respective speeds and sink rates, a side view will look like
this. After one minute, their positions relative to their starting
points will be shown by the distance graph (for simplicity we will
let one knot = 100 feet per minute - the error is trivial). That means
that the blue glider has flown 2,600 feet horizontally and 180 feet
vertically. Similarly, the green glider has flown 3,100' horizontally
and 160' vertically, the yellow glider 4,200' horizontally and 190'
vertically, and the red glider 6,200' horizontally and 320' vertically.
|
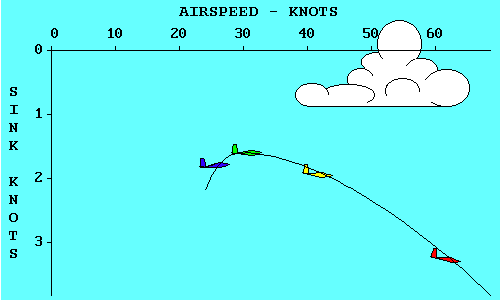 |
Now if we connect the gliders with a smooth curve and change the
distance scales to speed scales, we have just drawn a polar curve
for the Schweizer SGS 1-26.
|
So, what can we do with a polar curve?
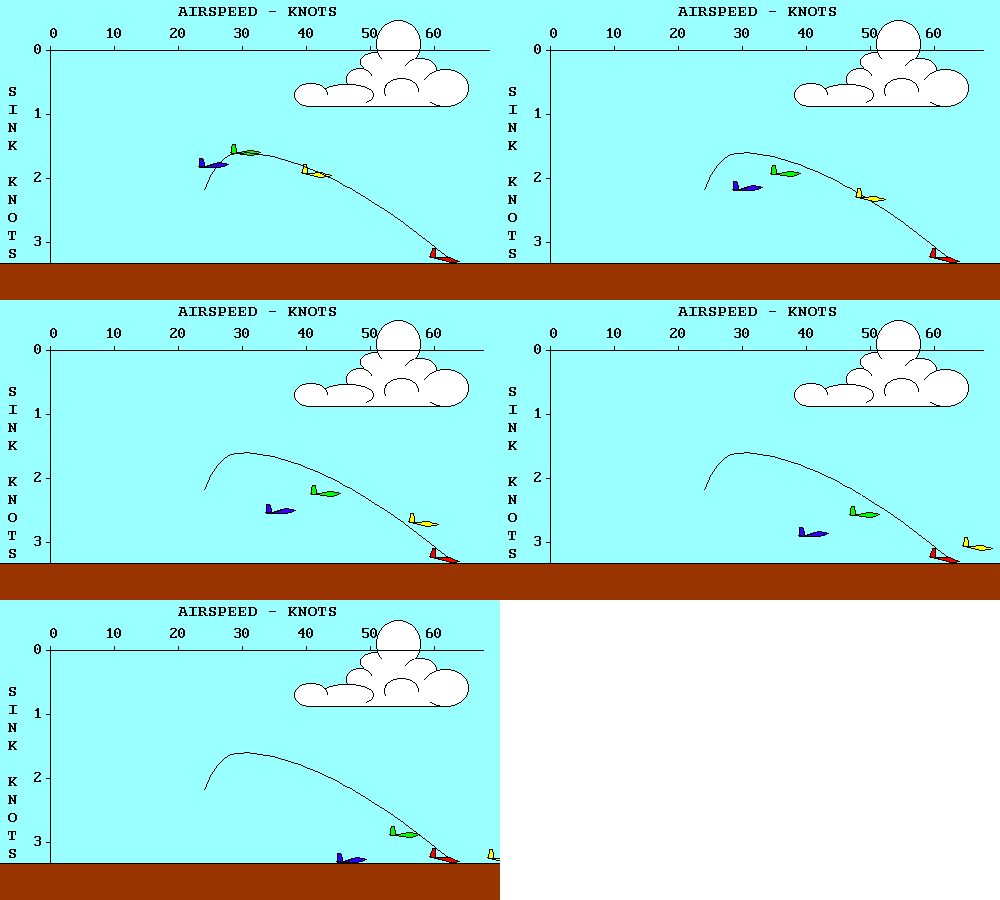 |
Lets pretend we started this exercise with the gliders 320 feet above
the ground. The red glider is already touching down (actually crashing
because we didn't allow any room for a flare). If we continue the
descent of the other gliders until the blue and yellow gliders also
reach the surface, we see several things. First, the yellow glider
goes farther than any other while losing 320 feet. The blue glider
touched down about the same time, but doesn't go nearly as far. The
green glider is still in the air, but will crash on top of the red
glider if it isn't moved quickly.
|
MINIMUM SINK SPEED
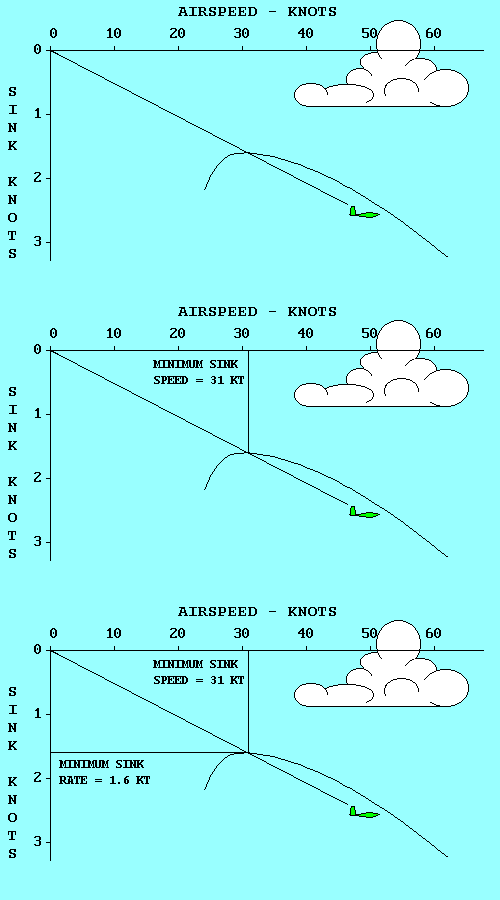 |
Two of these gliders represent significant points on a polar curve.
The green glider has the lowest sink rate of any. It will keep you in
the air for the longest time, but will not go very far. Note
that its glide path intersects the polar curve at its highest point.
If we move up from the highest point on the polar curve to the airspeed
scale we find that the minimum sink speed for a SGS 1-26 is 31 knots
(35 mph). If we move horizontally to the left we find that the minimum
sink rate is 1.6 knots (160 feet per minute).
|
BEST GLIDE SPEED
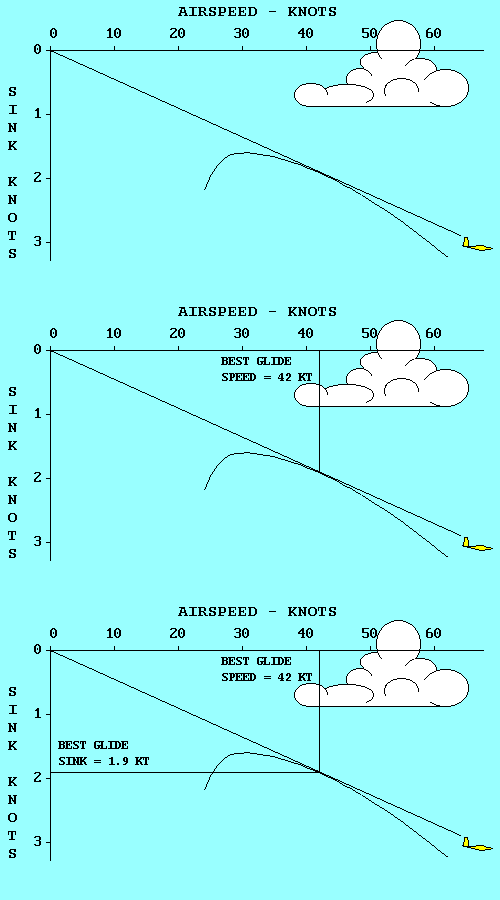 |
The yellow glider has the best glide ratio of all. That means that it
will glide farther in still air than any other glider, for a given loss
of altitude. A line from the origin (0, 0 point) of the graph, which is
tangent to (just touches) the polar curve, represents the glide path of
the yellow glider. If we move up from the point where the line touches
the polar curve to the airspeed scale, we find that the speed that
produces this best glide is 42 knots (48 mph). If we move
horizontally to the left from the tangent point we find the
corresponding sink rate, 1.9 knots (190 feet per minute).
|
We stretched the sink scale on our graph to make it easier to read. If we
had used the same scale as was used for the airspeed scale, the angle between
the glider flight path and the horizontal axis would be the actual glide
angle achieved by the glider. You can see that the smallest angle that can be
drawn from the origin to the polar curve is the one that just touches the curve.
That is why the tangent point represents the best glide speed for the glider.
If air was always still, that's all we'd need to know about polar
curves. Minimum sink speed would keep us in the air for the longest time
and best glide speed would allow us to go the greatest distance.
Fortunately for glider pilots, air frequently moves both vertically
and horizontally. When it goes up faster than our sink rate within it
we can climb. When it goes down we need to modify our best glide speed
to optimize our flight through sinking air.
SPEED-TO-FLY FOR DISTANCE
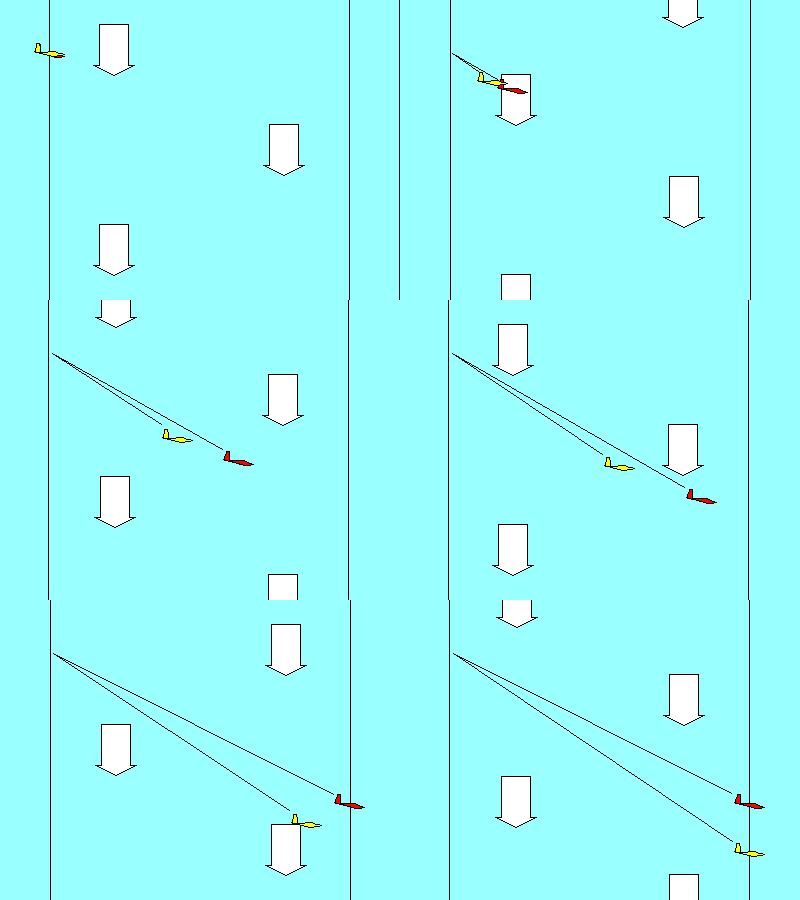
To see how sinking air
affects our glide let's compare the red and yellow gliders.
If both enter an air mass that is sinking at 300 feet
per minute (3-knots), their sink rates will
increase accordingly. The yellow glider is now sinking at 4.9 kts
(1.9 within the air mass plus 3 for the air mass sink rate). The red
glider is now sinking at 6.2 kts (3.2 + 3.0). Both enter the air mass at
the same altitude; our objective is to come out the other side with
the least loss of altitude. Although the red glider is sinking faster,
it is also moving horizontally much faster (62kts vs 42 kts). The
result is that it gets out of the sinking air at a higher altitude
than the yellow glider.
The red glider has a better glide ratio,
relative to the ground, than the yellow one even though the yellow
glider has a better glide ratio relative to the air mass.
By now you may have noticed that the speeds for our gliders in
these examples were not selected randomly. The green glider is flying
at Minimum Sink Speed, the yellow glider at Best Glide Speed (also
called best L/D Speed because the glide ratio in still air is
numerically equal to the ratio of lift to drag), and the red glider is
flying at the Speed-to-Fly for a SGS 1-26 flying in an air mass that
is sinking at 300 feet per minute. For now we will define Speed-to-Fly
as the speed that results in the flattest glide in both convection
and wind because it was so defined by the FAA in the predecessor to the
Practical Test Standards. Now let's look at how Speed-to-Fly can be
determined from the polar curve for any air mass sink rate.
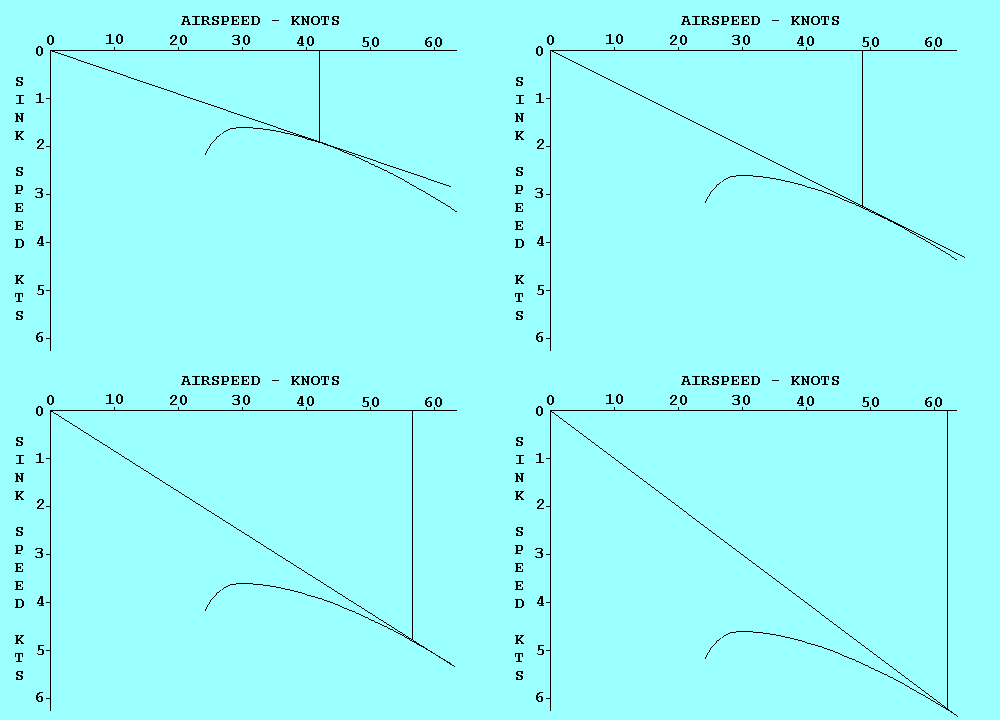 |
In our previous examples our polar curve showed performance relative
to the air mass in which the glider was flying. It was valid relative
to the ground only in still air. To be valid relative to the ground
the curve must be displaced in the direction and by the amount that
the air mass is moving. In this example the air is sinking at 300 feet
per minute (3 kts), so we move the curve down 3 kts.
To determine the Speed-to-Fly for any condition, we draw a line from
the origin that is just tangent to the curve. Then we draw a line
straight up from the tangent point to the speed scale. In this case
the Speed-to-Fly is 62 kts. Did that surprise you?
|
If you were trying to determine Speed-to-Fly from a polar curve drawn
on a piece of paper (maybe for a pilot examiner), you would find it
inconvenient to redraw the curve for each air mass sink rate.
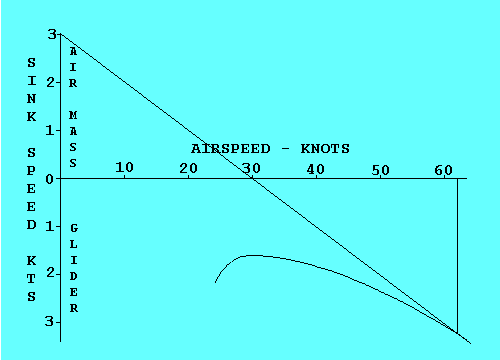 |
An easier way to accomplish the same objective is to raise the origin
of the graph by an amount equal to the air mass sink rate and then
draw a tangent to the original curve from that point. To keep our
examples consistent, let's assume a 3-knot air mass sink rate and
move the origin up 3 knots. Now the tangent to the original curve
occurs at the same 62 knots we found in the previous example. When
using this method be sure to remember that the glider sink rate is
the sum of its sink rate within the air mass and the sink rate of the
air mass itself. In this case it is 6.2 kts (air mass sink of 3 kts
plus glider sink within the air mass of 3.2 kts = 6.2 kts).
|
We can use the same technique to determine the Speed-to-Fly for any
motion of the air mass.
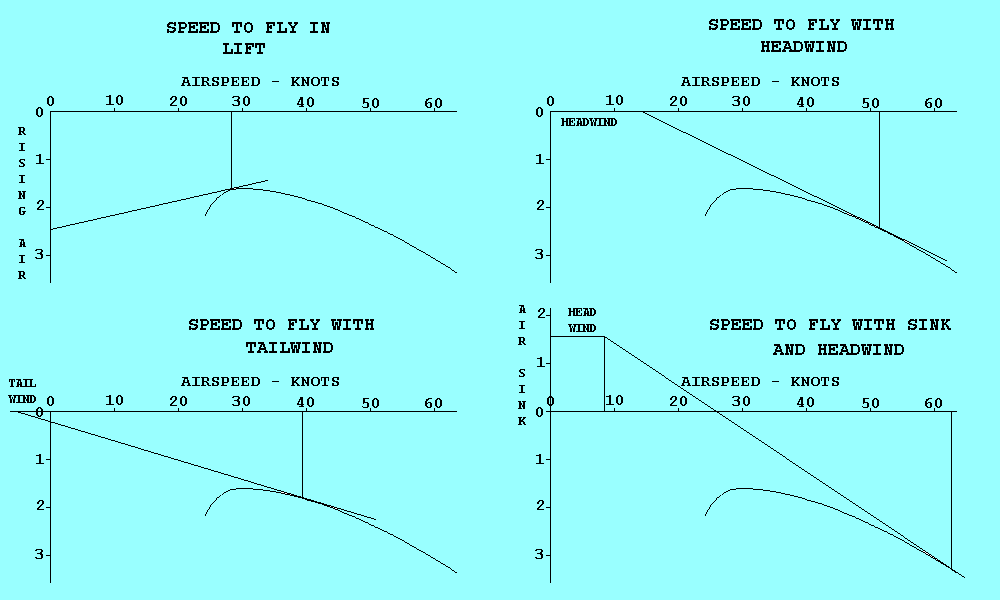 |
If the air is rising we displace the origin
down by an amount equal to the rate at which the air is going up, and
then draw a tangent from that point to the polar curve. This gives a
valid speed only if we plan to fly straight through the lift. If we
plan to circle in the lift, other factors determine the speed that
will optimize our climb rate.
For a headwind we displace the origin to the right, using the airspeed
scale to determine how far we move it. For a tailwind we displace the
origin to the left.
|
We can also combine vertical and horizontal air mass movement when both
exist. The example shows how to combine sink and a headwind.
You may be thinking, "This is all very interesting, but how do I use it
in the air. I'm not going to carry polar curve charts with me in the
glider and draw tangents for each condition I encounter." You are
right. The information derived here must be converted to cockpit
displays and/or rules of thumb to use in flight.
First let's discuss headwinds and tailwinds. You have to estimate their
values so a rule of thumb is as good as anything. If you were to
evaluate several different wind conditions graphically, you would find
that the tangent point moves about half as far as the origin. Thus, a
good rule would be "Add about half the estimated value of a headwind,
and subtract about half the value of a tailwind from the Speed-to-Fly
determined for lift or sink."
We should note here that the FAA knowledge tests ignore vertical air
movement between thermals when the question relates to Speed-to-Fly.
If you encounter a question about the speed to use with wind, the
correct answer will be to add half the headwind to best glide speed.
 But you may want to fly efficiently between thermals when the air is
moving vertically, even if the FAA doesn't care. Since thermals are part of the air mass in which you are flying, they are affected by wind the same way the glider is so wind can be ignored unless you are trying to reach a point on the ground (which is not affected by the wind). An example of when you would want to take wind into consideration is trying to make it back to the airport against a headwind. Instinct probably tells you to pull back on the stick to "stretch" the glide, but the correct thing to do is push forward until the airspeed equals the speed-to-fly plus half the headwind.
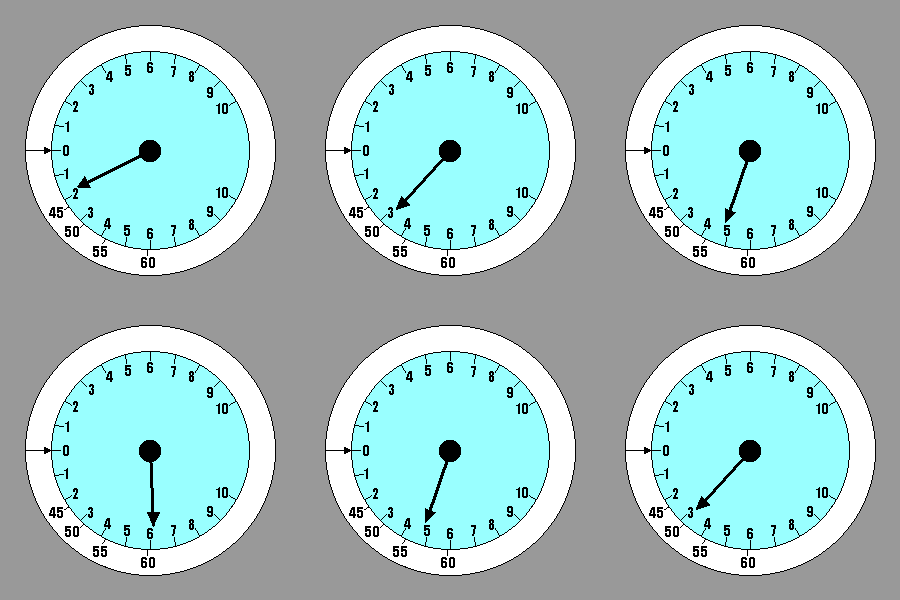
We have an instrument in the glider to give us the
information necessary to determine speed-to-fly for lift and sink. The graphic process used to determine Speed-to-Fly gave
us the sink rate of the air mass and the sink rate of the glider within
the air mass. Their total is the value that would be indicated on the
variometer. We could select a few representative values of Speed-to-Fly
and stick them on the panel adjacent to the corresponding variometer
readings, using a label maker. A better method is to invest in a
speed ring for the glider/variometer combination we have. The speed
ring is adjustable, but for our current definition of Speed-to-Fly it
should be set with the arrow on the ring pointing to "0" on the
variometer. Then when the variometer points to any rate of descent it
is also pointing to the corresponding Speed-to-Fly - the one that will
produce the flattest glide under those conditions. Our example shows
Speed-to-Fly varying from 42 kts in still air to 62 kts in 3 kt sink.
|
EFFECT OF WEIGHT
The performance data used here is based on a SGS 1-26 at 575 pounds
gross weight, as shown in Appendix A, The Joy of Soaring
(12).
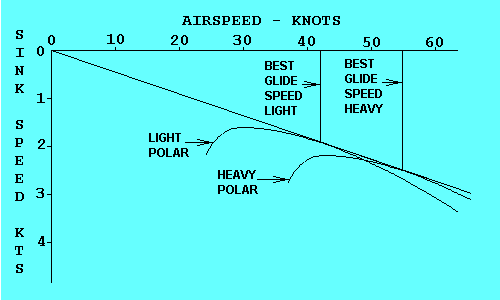 A different polar curve exists for the same glider at every gross
weight. As the weight increases the polar moves down and to the right
and becomes a little flatter, but retains approximately the same shape.
Both airspeed and sink rate increase for equivalent points on the
curves, but their ratio remains the same. Both heavy and light gliders
achieve the same best glide ratio, as shown here,
but the heavy glider does so at a
higher speed. This is the reason for carrying ballast to improve
glide performance when the thermals are strong enough, even though
the climb rate suffers.
The formula for the lift generated by a wing is:
L = CL x d/2 x S x V2, where L is the lift force,
CL is the coefficient of lift (directly proportional to the angle of
attack if the wing is not stalled), "d" is the density of the air,
S is the wing area, and V is the airspeed. The formula for total drag is
D = CD x d/2 x S x V2, where D is the total drag force,
CD is the coefficient of total drag equal to the sum of the coefficients
of parasite and induced drag, and the other terms are the same as in the lift
formula. The formula for the coefficient of total drag is
CD = C0 + CL2/
( x A x e).
C0 is the coefficient of parasite drag and is essentially constant.
The remaining expression shows that induced drag is highly dependent on the
coefficient of lift (high angle of attack usually at low airspeed) and aspect ratio
(A). "e" is there to account for other factors, but its value is usually near 1 for
gliders. Don't panic; you are not required to memorize these formulae. x A x e).
C0 is the coefficient of parasite drag and is essentially constant.
The remaining expression shows that induced drag is highly dependent on the
coefficient of lift (high angle of attack usually at low airspeed) and aspect ratio
(A). "e" is there to account for other factors, but its value is usually near 1 for
gliders. Don't panic; you are not required to memorize these formulae.
The
message you need to get is that both lift and drag depend on air density and
airspeed and two factors associated with the specific glider, wing area, and
coefficient of lift. When weight increases, lift must increase proportionately.
If we are to fly the glider in the same air mass (e.g. same density), with the
same wing area, and at the most efficient coefficient of lift, we must increase
the airspeed. When we do, the drag increases in the same proportion as lift, so
the lift/drag ratio remains the same.
EFFECT OF TURNING
The increase in load factor that accompanies turning flight is equivalent to an
increase in weight with respect to performance airspeeds. The polar curve is
effectively displaced down and to the right. The most significant aspect of this
shift is that the minimum sink speed is higher when turning (e.g. when thermalling)
than it is in straight flight. This increase, as with stall speed, is proportional
to the square root of load factor, and equals a 4l% increase at a 60-degree bank.
We should note that the glider performance graphs used with the FAA knowledge tests
(shown below) are
not presented in the same format as those in our illustrations. The curve labeled "GLIDE ANGLE" looks like a polar curve, but it is not.
It is derived from a polar curve and allows direct measurement of glide ratio (not
really glide angle). The curve labeled
"SINKING SPEED" is essentially the same as the polar curves we have been using except that it
is inverted. Some engineers prefer it that way but many glider pilots find the version
that shows increasing sink down rather than up to be a more logical presentation. If you
wanted to find the best glide speed graphically from this graph you would have to extend
both scales back to zero, since that is where the tangent line must start.
The new FAA publication, "Glider Flying Handbook"(18), illustrates polar curves in the same way
that we have done so here, so some future version of the knowledge test may do so as well. In
the meantime, check the illustrations carefully for how they are labeled. Similar curves do
not always represent the same information.
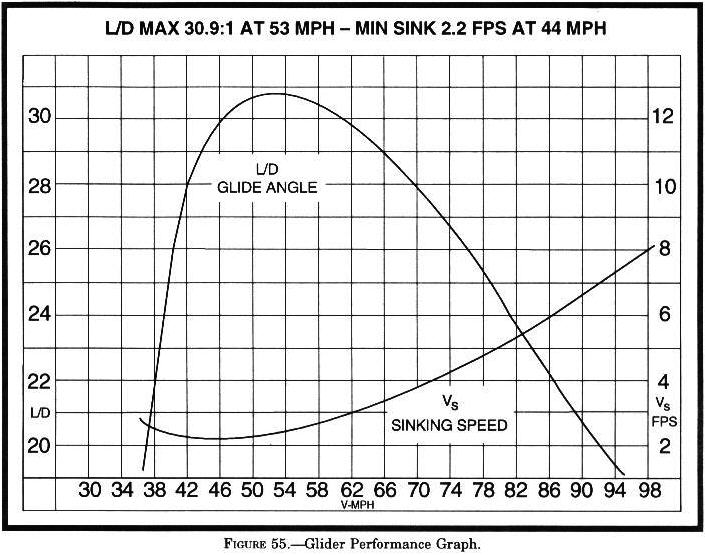
© 2005 Jim D. Burch 602-942-2734
jdburch@att.net
To return to table of contents select TOC
|
 In our illustrations, the red vector represents the combined effect
of the two blue vectors. We add the blue vectors by drawing a
parallelogram (in most of our aerodynamic examples it is also a rectangle) with the two
blue forces represented by the two blue sides. The red vector is the diagonal of
the
parallelogram, and its magnitude and direction represents the
combined effect of the two blue vectors. The mathematical term
for the red vector is that it is the "resultant" of the blue forces.


 By now the reader probably has detected the author's slight bias against
Bernoulli's Theorem as an appropriate explanation for how an airfoil develops
lift. However, it still appears as the correct answer for several knowledge test
questions. Therefore, if the question is concerned with what is happening above
the wing, the correct answer will be Bernoulli. If the question relates to action
below the wing the answer will be something about deflection of air (Newton).

 The other kind of drag is induced drag and is a by-product of the generation of
lift. Even if parasite drag were reduced to zero, the aerodynamic force on a
wing deflecting the relative wind would not be perpendicular to the direction of
flight, and the greater the wind deflection the greater the deviation of that
force from perpendicular. Sometimes it is helpful to describe the total
aerodynamic force (excluding parasite drag) as "true lift" perpendicular to
the "average" relative wind. This explanation recognizes that the relative wind
is deflected by the airfoil and its direction after deflection, called "downwash",
is no longer parallel to the flight path. Thus its "average" direction lies
somewhere between the flight path and the downwash angle.
 There are two ways to increase the degree of deflection of the relative wind, and
they require defining three more terms. A straight line drawn from the airfoil
leading edge to its trailing edge is the "chord line". A curved line drawn between
the same two points and midway between the upper and lower surface of the airfoil
defines its "mean camber", often simply called "camber". If the term camber
includes the modifiers "upper" or "lower" it is referring to the curvature of the
upper or lower surface of the wing. The angle between the chord line and the
relative wind is called the "angle of attack". Increasing the angle of attack or
increasing the camber increases the degree to which air is deflected by the
airfoil, and thus increases both lift and induced drag for a constant airspeed.
Angle of attack should not be confused with "angle of incidence", which refers
to the angle formed by the chord line and the longitudinal axis of the aircraft.
Angle of incidence is fixed; the pilot controls angle of attack.

 In wings level, unaccelerated flight the total lift force is essentially equal
to the weight of the aircraft. We will defer until later a more complete
discussion of forces acting on the glider in flight. For now we need only
recognize that the lift force depends on the angle through which the relative
wind is being deflected (downwash) and the rate at which air is moving past the
airfoil. The same lift force can be created by deflecting a lot of air through
a small angle or a little air through a large angle. If we assume camber to be
fixed, the angle of deflection of the relative wind depends on the angle of
attack, and the amount of air moving past the airfoil depends on the airspeed.
Thus to keep lift constant we must associate high speed with low angle of attack
and low speed with high angle of attack.
 With all those aircraft up there deflecting air downward you'd think there
wouldn't be any left except at the surface. That isn't true, of course, because
the deflected air returns more or less to its original position after passage of
the airfoil. In fact, even as the air is being deflected downward by a wing, it
is escaping around the wing tips in an attempt to return to its original position,
creating "trailing vortices", which resemble little tornadoes coming backward
from the wing tips. They are the main constituents of "wake turbulence", sometimes
incorrectly called "prop wash". It occurs behind every airfoil that is generating
lift and can represent a significant safety hazard when caused by a large
airplane. Since it is a direct result of the air being deflected, it is greatest
when deflection is greatest, i.e. when the aircraft is heavy and slow.
Glider pilots utilizing aero tow find that flight in the wake of the towplane
is possible but not desirable.
 Before we leave the discussion of airfoils, we should examine what happens if we
continue to increase angle of attack. As you might expect there is some point
where the relative wind will no longer follow the sharply curved path that the
airfoil is trying to force it to follow. It is not unlike a racecar that
hurtles off the track while trying to negotiate a too sharp curve. The relative
wind breaks away from the airfoil, accompanied by a relatively abrupt increase in
drag and a similar decrease in lift. This action is called a "stall" and is
dependent only on the angle of attack. Unlike the racecar, speed has nothing to
do with it, but since gliders usually have airspeed indicators but not angle of
attack indicators, we recognize "stall speed" as that speed at which a glider
gradually slowing down with wings level reaches the critical (stalling) angle of
attack. It is important to remember that stalls can occur at any airspeed
and in
any attitude, even though they frequently are practiced with wings level and nose
high.


 If a glider travels 20 feet forward for each foot it descends, it has a 20 to 1
glide ratio. This relationship also applies to speed since there is no significant
difference in horizontal speed and the speed along the actual glide path. Thus a
glider flying at 40 knots airspeed and descending at 2 knots vertical speed also
has a 20 to 1 glide ratio.


 In our example of positive static stability the lug nut overshot the center of
the hubcap before it started back the other way. Each time it did this, however,
the amount of overshoot was less until it finally stopped in the center. That is
an example of positive "dynamic" stability. If the overshoot had grown larger
each cycle until the lug nut escaped the hubcap and disappeared, that would
have been an example of positive static stability with negative
dynamic stability. Lug nuts don't do that but aircraft can.
An example might be "flutter", where a component of the aircraft fails due to rapid uncontrolled oscillation.
 In our illustration an airfoil with an attached control surface, such as an aileron, is displaced upward by a gust. Because the center of gravity of the control surface is aft of its hinge point, the surface lags behind the airfoil as it rises. This downward deflection of the control surface increases the upward aerodynamic force on the airfoil and forces it even higher. If this example represented a wing, the wing would bend upward until its resistance to bending equaled the upward force. Then the wing would start back down and the aileron would deflect upward, again due to its cg location aft of the hinge point. Now the aerodynamic effect of the deflected aileron is adding to the downward force. The whole process reverses again when the airfoil reaches its lowest position, and it continues to flutter up and down until it departs from the aircraft. The chances of this happening can be greatly reduced if not eliminated by placing counterweights on the other side of the control surface hinge line to move its center of gravity near the hinge.


 Longitudinal stability is often compared to a seesaw. Several of the knowledge
test questions use an illustration that looks a lot like a seesaw except that
boxes are substituted for boys. In our example, the seesaw is balanced when the
moments on each end are equal. We can do that with a big boy on the short end and
a small boy on the long end. The 80 pound boy times his 50 inch arm balances the
sum of the 50 pound seesaw times its 10 inch arm plus the 50 pound boy when he
moves out to 70 inches. (80 x 50) = (50 x 10) + (50 x 70). Note also that the sum
of the forces acting upward is equal to the sum of the forces acting downward.
(180) = (80 + 50 + 50).
 If we substitute a glider for the seesaw, we can see that the moment problem is
essentially the same. Instead of the large boy, we substitute the weight of the
loaded glider. We can treat that weight as if it were concentrated at the glider
"center of gravity" (CG). The fulcrum where the seesaw was balanced has been
replaced by the "center of lift" of the glider wing. Sometimes referred to as
the center of pressure, this is the point where the sum of the aerodynamic forces
on the wing can be treated as a single force. It is not the same as the
"aerodynamic center". The small boy is replaced by the aerodynamic force on the
glider's tail surfaces, shown in red in our illustration.
Common sense tells you that the force on the tail should be up like the wing. It
also tells you that the earth is flat. Neither is correct. In most flight
conditions, the force on the tail is down, and that is how we obtain longitudinal
stability.


 Stability of a glider is good because it allows pilots to scratch their noses or
get a drink from their canteens without losing control of the aircraft, but
frequently they want to cause the glider to do something opposing stability, like
turn. If stability were our only objective, airfoils would not need movable
surfaces such as ailerons on the wings, the elevator on the horizontal tail or the
rudder on the vertical tail. These provide for control of roll, pitch and yaw,
respectively. They achieve control by changing the camber of the airfoil to which
they are attached, which in turn changes the lift and drag of that airfoil.

 Before discussing the application of these controls to maneuvers, we should review
Newton's first and second laws as they apply to gliders. If the forces on a glider
in flight are balanced it will continue moving in a straight line at a constant
speed. We refer to this as a "steady state" condition. If the forces on the glider
are unbalanced it will move in the direction of the net force and accelerate until
the forces are again balanced. We refer to this condition as "transient", the
change from one steady state to another. Newton's laws apply to everything. If a
sick sack is dropped it will accelerate downward due to the unbalanced force of
gravity until air resistance builds a drag force equal to its weight. It then
assumes a steady state condition at that speed with weight and drag equal.
(Similarly, its initial horizontal speed, if any, decreases due to unbalanced
horizontal drag until both speed and drag are essentially zero.)
 If we want to change the direction of flight (i.e. turn the glider) we must apply
a force in the direction we want to go. If we were driving a car we could point
it in that direction and the friction between the tires and the road would provide
the turning force unless we were driving on ice. Since air is even slipperier than
ice, pointing the glider in the new direction won't work very well. The strongest
controllable force we have in the glider is lift. In straight flight lift is
pointed straight up, when viewed from the front or rear. If we roll the glider so
that the lift is inclined to one side we have a horizontal component of lift to
act as the necessary force to change our direction of flight. Because the vertical
component of lift still needs to equal weight, the total lift, represented by the
red
vector in the illustration, must be increased. This usually is accomplished by
increasing the angle of attack but the glider left alone will do it by sacrificing
altitude for speed. "Sometimes during early training in steep turns, the nose
may be allowed to get excessively low resulting in a significant loss of altitude.
To recover, the pilot should first reduce the angle of bank with coordinated use
of rudder and aileron, then raise the nose of the airplane ..with the elevator."
(9)
 The turn is a more complex maneuver than the preceding description suggests.
While the glider is rolling into the turn (and also while it is rolling out) the
increased lift on the rising wing is accompanied by an increase in induced drag
which causes "adverse yaw", a yawing motion opposite from the intended turn
direction when rolling in. The only function of the rudder in turn
entry and roll out is to offset this adverse yaw. Our illustration shows banking
for a left turn without using rudder - the nose yaws right.
"If the nose starts to move before the bank starts, rudder is being applied too
soon. If the bank starts before the nose starts turning, or the nose moves in the
opposite direction, the rudder is being applied too late."
(9)
Adverse yaw is greater for
gliders than for most airplanes because the long wing span provides a longer
lever arm for the force to act through. It is usually
much more noticeable at low speeds because the wing is already operating at a high
coefficient of lift. The coefficient of induced drag varies with the square of
the coefficient of lift, so the same lift increase due to aileron deflection results
in greater adverse yaw at low speed than at high speed.
 Once the turn is established the wing on the outside of the turn is traveling
faster than the one on the inside because it is traversing a larger circle in
the same time. Since both lift and drag increase with speed, they are greater
for the outside wing and result in an "overbanking tendency" and "yaw away from
an established turn", respectively. Note that this yaw is not the same as adverse
yaw, but it is corrected the same way, with rudder to keep the fuselage aligned
with the direction of flight.
Overbanking is corrected with aileron opposite the
direction of turn. Both these phenomena are much more evident in gliders than in
other aircraft because the glider's longer wings provide a greater speed
difference between the wing tips. They are a function of wingspan and turn
radius. The formula for turn radius in feet is:
 As shown in this graph, at an angle of bank of slightly more than 80o, the load factor exceeds 6.
The stall speed increases as the square root of the load
factor; at a 60-degree bank the load factor is 2 and the stall speed increases 41%.
All other performance speeds, which we will discuss later, are affected
similarly. Note that load factor depends only on bank angle; it is independent
of speed.

 When the glider wings are level, lift and weight are essentially equal and
generally constant. If lift is fixed and the glide ratio is numerically equal to the
lift/drag ratio, we can change the glide ratio only by changing drag. One way to
increase drag is to slip the glider. We have just discussed slips in a turn, which
can be
useful, but straight-line slips are probably more common and have more applications.
We initiate a slip by lowering one wing, just as we do to initiate a turn. To prevent
the yawing part of a turn, we apply sufficient opposite rudder to achieve a straight-line
course. If you are wondering what happened to the horizontal component of lift,
it is offset by an equal but opposite horizontal "lift" force, created by the
fuselage, which is now at an angle to the relative wind.
 Wing lift is a function of angle of attack as shown in the accompanying
illustration. At normal values of angle of attack the coefficient of lift increases
with angle of attack. At values greater than the critical (stalling) angle the
coefficient of lift decreases as the angle of attack increases.
As the spinning glider rotates about the longitudinal axis the descending wing angle of
attack is increased, stalling it further. The rising wing angle of attack is
reduced, making it less stalled.
 In this illustration the horizontal blue vectors represent horizontal motion
of the wing tips. The vertical blue vectors represent their vertical motion.
The red vectors are the resultants of the pairs of blue vectors and represent the
flight paths of the wing tips into the relative wind.
The use of rudder to stop rotation in a spin or to pick up
a low wing during a stall to prevent spinning is effective because the yawing
motion increases the forward speed of the low wing. Since the vertical speed of
the wing is unchanged, this reduces the wing angle of attack (shown in green). Just
the opposite happens for the high wing (shown in brown). Since the wings are stalled,
reducing
angle of attack increases lift, the reverse of the normal, unstalled relationship,
and increasing speed always increases lift. Use of ailerons to pick up a stalled
wing may actually have the opposite effect since the increase in camber tries to
bend the relative wind more just as increasing angle of attack does.


 A different polar curve exists for the same glider at every gross
weight. As the weight increases the polar moves down and to the right
and becomes a little flatter, but retains approximately the same shape.
Both airspeed and sink rate increase for equivalent points on the
curves, but their ratio remains the same. Both heavy and light gliders
achieve the same best glide ratio, as shown here,
but the heavy glider does so at a
higher speed. This is the reason for carrying ballast to improve
glide performance when the thermals are strong enough, even though
the climb rate suffers.
