MAGNETIC COMPASS
The magnetic compass is one of the most reliable instruments found in aircraft, but its interpretation can be difficult unless the pilot understands its characteristics. First it must be recognized that the compass presents directions relative to magnetic north, not true north. The difference varies from place to place and can be determined by the dashed magenta isogonic lines shown on aeronautical charts. This difference is called magnetic variation. Compass deviation is error due to magnetic fields within the aircraft, and varies depending on aircraft heading. Deviation usually can be reduced to a very small error, which is then displayed on a card near the compass.
The earth's magnetic lines of force are not parallel to its surface except near the equator. This is called "magnetic dip" and it causes false indications by the compass when the aircraft is turning, accelerating or decelerating.
 In our illustration, magnetic dip is shown by the blue line, which indicates that the earth's magnetic field tips down to the north in the northern hemisphere. The magnets inside the compass, represented by the red arrow, tend to align with this field. The compass card can be compared to an inverted bowl, suspended at the top center as illustrated. If the glider is accelerated while on an easterly heading, the card swings toward the observer because its center of gravity is below its point of suspension. The magnets in the compass, still trying to align with the earth's magnetic field, cause the compass card to rotate, indicating a turn to the north. If the glider decelerates, the reverse occurs and the compass indicates a turn to the south. With a little imagination you can see that the same thing happens on a westerly heading.
The memory aid "ANDS" reminds us that acceleration (A) results in an indication of turn to the north (N), and deceleration (D) a turn to the south (S). This error is greatest on headings of east or west, diminishing to zero on headings of north or south.
In our illustration, magnetic dip is shown by the blue line, which indicates that the earth's magnetic field tips down to the north in the northern hemisphere. The magnets inside the compass, represented by the red arrow, tend to align with this field. The compass card can be compared to an inverted bowl, suspended at the top center as illustrated. If the glider is accelerated while on an easterly heading, the card swings toward the observer because its center of gravity is below its point of suspension. The magnets in the compass, still trying to align with the earth's magnetic field, cause the compass card to rotate, indicating a turn to the north. If the glider decelerates, the reverse occurs and the compass indicates a turn to the south. With a little imagination you can see that the same thing happens on a westerly heading.
The memory aid "ANDS" reminds us that acceleration (A) results in an indication of turn to the north (N), and deceleration (D) a turn to the south (S). This error is greatest on headings of east or west, diminishing to zero on headings of north or south.
Magnetic dip also affects the compass when turning on headings near north or south, diminishing to zero on headings of east and west.
With a little more imagination and remembering that a turn is accelerating sideways in response to the horizontal component of lift, we can see why. Imagine you are viewing the illustration from the right, looking left or to the north. A right turn affects the compass the same way as accelerating to the east. The rotation of the compass card makes it appear to the viewer that the glider has started a left turn.
When turning with a heading near north, the compass will lag behind the actual heading. It will lead the actual heading on turns near south. The practical effect of all this for glider pilots is to believe the compass only when flying straight at constant speed, and to ignore deviation if the error is small.
INCLINOMETER AND YAW STRING
 The inclinometer, that thing that looks like a level, and the yaw string both provide information about how efficiently the glider is flying. Specifically, they show if the fuselage is aligned with the direction of flight. The yaw string is a miniature windsock that aligns with the relative wind. The inclinometer shows the relative effects of gravity and centrifugal force. When they are properly balanced you feel upright even in a turn and the ball in the inclinometer is centered.
Although these instruments reflect the coordinated use of controls, it is usually satisfactory to think of them as indicating the need for rudder application. "Step on the ball" is a familiar expression to airplane pilots and it applies equally to glider pilots. Since the yaw string is displaced to the right when the ball is displaced to the left, the pilot needs a different memory aid for it. Some imagine that the attached end of the yaw string is an arrowhead pointing to the rudder pedal to which pressure should be increased.
The inclinometer, that thing that looks like a level, and the yaw string both provide information about how efficiently the glider is flying. Specifically, they show if the fuselage is aligned with the direction of flight. The yaw string is a miniature windsock that aligns with the relative wind. The inclinometer shows the relative effects of gravity and centrifugal force. When they are properly balanced you feel upright even in a turn and the ball in the inclinometer is centered.
Although these instruments reflect the coordinated use of controls, it is usually satisfactory to think of them as indicating the need for rudder application. "Step on the ball" is a familiar expression to airplane pilots and it applies equally to glider pilots. Since the yaw string is displaced to the right when the ball is displaced to the left, the pilot needs a different memory aid for it. Some imagine that the attached end of the yaw string is an arrowhead pointing to the rudder pedal to which pressure should be increased.
The glider in our illustration is in a left turn. It is properly coordinated only when the ball and yaw string are centered. When the ball is to the left and the yaw string to the right, the glider is in a slipping turn. This is a safe maneuver if the pilot wants to lose altitude. When the ball is to the right and the yaw string to the left, the glider is in a skidding turn - never a good idea.
THE PITOT-STATIC SYSTEM
Applicants for practical tests should be prepared to demonstrate
knowledge about any system installed in the glider used for the test.
Fortunately for most applicants that may be only the pitot/static
system, but even so, enough fail in this area to make it one of the
top ten failure subjects.
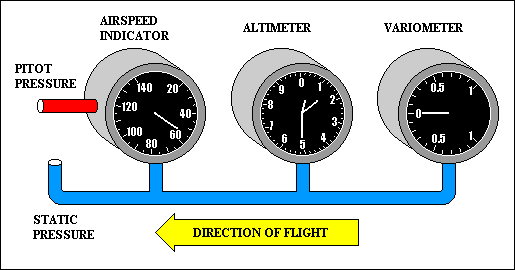 |
The pitot/static system consists of sensors to measure two different
air pressures and the instruments to interpret those pressures in
terms of airspeed, altitude and vertical speed. Pitot pressure is
measured through a forward facing port, where its value increases as
airspeed increases. Static pressure is measured through a port located so
that its value is independent of speed, generally perpendicular to the
direction of flight.
|
The airspeed indicator and the variometer each have only one hand so interpretation is obvious. The altimeter has three hands and can be misread if the pilot is careless. The shortest hand shows tens of thousands of feet, the medium hand shows thousands, and the longest hand shows hundreds of feet.
ALTIMETER
 |
Pressure, density and temperature of the atmosphere all generally
decrease as altitude increases. Pressure decreases at a fairly
predictable one inch of mercury per thousand feet altitude. Thus, if
we measure this pressure, we can determine our altitude, and that is
exactly what an altimeter does. To do so, it utilizes one or more
small cookie shaped, thin metal containers, illustrated schematically
here as a bellows, that can expand and contract as the pressure around
them varies. For an altimeter the containers are sealed and static
pressure is introduced to the area outside the containers. As the glider
climbs, the static pressure decreases (1" hg per 1,000'), the container
expands and moves a pointer connected through suitable linkage. The
linkage in a real altimeter is more complex than the rack and pinion
shown here, but the concept is the same.
|
For the altimeter to indicate correctly, it must be adjusted for the
atmospheric pressure existing at the time. That usually only requires
that the pilot set the altimeter to the correct field elevation just
prior to takeoff. If the flight is long or covers a long distance it
may be necessary to reset the altimeter during flight. That can be done
by obtaining the current sea level pressure for the area, and setting
that value in the small barometric scale window on the altimeter.
The value shown in the window and the indicated altitude both move in the same direction when making changes, i.e. an increase in the value shown in the window will result in an increase in the indicated altitude.
FAR 91.121 says if you are flying below 18,000 feet MSL, your altimeter must be set to the setting of an appropriate available station (preferably within 100 NM) or the departure airport elevation. If you are lucky enough to be above 18,000 feet MSL your altimeter should be set to 29.92 inches Hg.
The altitude we have just described is called "Indicated Altitude". It is exactly correct only in a "standard atmosphere". Other altitudes are:
- True Altitude - The true vertical distance above sea level. It differs from the indicated altitude when the air temperature is not standard.
- Absolute Altitude - The vertical distance above the ground.
- Pressure Altitude - The altitude indicated when the altimeter is set to 29.92.
- Density Altitude - Pressure altitude corrected for nonstandard temperature. Density altitude is the altitude in the standard atmosphere where the air density is the same as it is where you are. The glider and its instruments perform as if they were at that altitude in the standard atmosphere.
 |
The pressure measured by the altimeter results from the weight of the
air above it. It is helpful to visualize the ocean of air in which we
fly as similar to an ocean of water; the deeper the water (air) the
greater the pressure. There is more air above a given altitude when the
pressure is high than when it is low.
If an aircraft maintains the same altimeter reading
while flying from an area of high pressure to an area of low pressure,
the actual altitude of the aircraft will decrease. A simple rule to
help remember this is "From High to Low, Look Out Below".
|
A similar condition exists when flying from a warm area to a colder
area. The colder air occupies less space, so for equal surface
pressures the "top" of the air must be lower. As in the case of an
aircraft flying from high pressure to low pressure, one flying from
high temperature to low temperature while maintaining the same
altimeter reading will also descend. The same "High to Low" rule
applies.
AIRSPEED INDICATOR
 |
Pitot pressure is the sum of static pressure and dynamic pressure.
The difference between pitot pressure and static pressure would then
be dynamic pressure, and dynamic pressure is related to airspeed.
The airspeed indicator is fundamentally similar to the altimeter, and
we can use the same schematic illustration to show how it works. The
essential difference is that for the airspeed indicator we introduce
pitot pressure to the inside of the pressure-sensing device (bellows
in our illustration). As airspeed increases so does dynamic pressure,
and the bellows expands, moving the indicator through suitable linkage.
|
As with all instruments, what we see on the airspeed indicator contains some error. Calibrated airspeed is indicated airspeed corrected for instrument and installation errors. The error is usually greatest at low airspeeds.
Dynamic pressure varies with air density as well as airspeed. Because
density decreases with altitude, dynamic pressure for the same true
airspeed also decreases with altitude. Therefore, true airspeed is
higher than indicated airspeed when flying above standard sea level
conditions. A good approximation of true airspeed is to increase
indicated airspeed by two percent for each 1,000 feet of altitude.
It is also important to remember that all performance speeds, such
as stall speed, occur at the same indicated airspeed regardless of
altitude.
There are a number of airspeeds that have specific definitions and airspeed indicator markings that make good test questions:

|
VA means design maneuvering speed. (not shown on ASI)
VF means design flap speed.
VFE means maximum flap extended speed. (top of the white arc)
VH means maximum speed in level flight with maximum continuous power.
VLE means maximum landing gear extended speed.
VNE means never-exceed speed. (red line)
VNO means maximum structural cruising speed. (top of the green arc)
VS0 means the stalling speed or the minimum steady flight speed in the landing configuration. (bottom of the white arc)
VS1 means the stalling speed or the minimum steady flight speed obtained in a specific configuration. (bottom of the green arc)
|
The white arc on the airspeed indicator shows the flap operating speed range.
The yellow arc is the "Caution" range and should be avoided except in smooth air.
VARIOMETER
If we have a container with a small opening in it, the pressure inside
the container will soon equal that outside the container by allowing
air to pass through the small hole. If we then raise the container,
outside pressure (static pressure) will decrease and air will flow out
of the container at a rate that varies with how fast we are raising
the container. Similarly, air will flow into the container when it
descends.
 Most variometers indicate vertical speed by measuring the
flow of air into and out of the container, called a reference chamber.
It is also possible to measure vertical speed by measuring the
pressure difference between the static source and the reference chamber.
Most airplane VSIs do this, and their reference chamber is the
instrument housing itself.
Most variometers indicate vertical speed by measuring the
flow of air into and out of the container, called a reference chamber.
It is also possible to measure vertical speed by measuring the
pressure difference between the static source and the reference chamber.
Most airplane VSIs do this, and their reference chamber is the
instrument housing itself.
Gliders often have a separate reference
chamber which is essentially a thermos bottle connected to the
variometer. Our illustration shows an early type of variometer in which
air flowing out of the reference chamber lifts a green pellet, and air
flowing into the reference chamber lifts a red pellet. Early glider
pilots referred to rising air as "green" air. Modern variometers use
other mechanical or electronic methods of measuring airflow but the
concept is the same as the old pellet vario. Electronic variometers may offer the ability to adjust sensitivity in flight.
TOTAL ENERGY COMPENSATION
The most common reason for failing a practical test because of lack of
knowledge about the pitot-static system is inadequate understanding of
total energy compensation for a variometer. A glider in flight
possesses two kinds of energy. Kinetic energy is due to its speed and
potential energy is due to its altitude. The pilot can trade one for
the other within limits. Diving will increase speed at the expense of
altitude. Pulling up will gain altitude at the expense of speed. The
only way to increase total energy is to find a lift source.
The significance of all this is evident when a pilot flying at relatively high
inter-thermal speed pulls up to work a thermal at thermaling speed.
An uncompensated variometer will show the climb due to the pull up as
well as the climb due to the thermal. If the pull up pegs the vario, it
will be impossible to assess the thermal strength without wasting a
lot of time. If the vario showed only the climb due to the thermal,
our problem would be solved, and total energy compensation does just
that.
The most popular way to implement total energy compensation is to use
a special static port for the variometer. The pressure in a venturi
tube decreases as the speed of the air through it increases. If we
use a venturi tube for the vario static port it will sense speed as
well as static pressure. Such a static source would not be suitable for
the altimeter because it would always present a lower static pressure
than ambient, but variometers don't care about absolute pressure, only
changes in pressure.
 |
With total energy compensation, when we pitch up
in still air
to trade speed for altitude, the decreasing speed of air through the
venturi tube increases air pressure just enough to offset the decrease
in ambient pressure. The variometer sees no change in static pressure
and indicates no climb. If we are executing the pull up in rising air
the venturi pressure offsets only that part of the climb that is due to
the speed change. The remaining ambient pressure change is due to
rising air. In our illustration we assume still air so the variometer always
indicates the glider still air sink rate for the corresponding air speed.
|
Total energy compensation works the same way in reverse
(i.e. when we are diving) but we are usually more interested in using
it to remove "stick thermals".
In addition to removing the effect of speed changes from the variometer
indication, it is also possible to remove the glider
still air sink rate for the current airspeed. This type of total energy
compensation is called a "netto" system and shows only the air mass
vertical movement. That is probably overkill for most of us, but
anyone leaving the traffic pattern can benefit from basic total energy
compensation.
OXYGEN SYSTEMS
Although the glider used for the practical test may not carry an oxygen
system, it is capable of reaching altitudes where oxygen is required,
so the examiner probably expects the applicant to know something about
oxygen systems and their application. If the pilot has had the
opportunity to experience hypoxia in an altitude chamber the need for
this knowledge will be obvious. Like the drunk who thinks he can whip
anybody in the bar, the pilot with hypoxia thinks he/she can fly better
than anyone else in the sky.
"From 12,000 to 15,000 feet of altitude, judgment, memory, alertness, coordination and the ability to make calculations are impaired, and headache, drowsiness, dizziness and either a sense of well-being (euphoria) or belligerence occur."
(4)
If you wait until you think you need
oxygen, you won't care, so know the rules and apply them as if your
life depended on it - it does.
When gases are mixed, the total pressure they exert is the sum of their
partial pressures. Air is about one-fifth oxygen at all altitudes
so the partial pressure of oxygen is about one-fifth of the ambient
pressure at any altitude. The ability of the lungs to transfer oxygen
to the blood stream depends on the partial pressure of oxygen. We can
maintain an acceptable value at higher altitudes by increasing the
total pressure or by increasing the percent of oxygen in the air.
Either way increases the partial pressure of oxygen. Since we usually
don't have pressurized cabins in gliders, we must use supplemental
oxygen and increase the percent of oxygen in the air we breathe.
 Regulations require pilots to use oxygen after thirty minutes above
12,500 feet and all the time above 14,000 feet. They must provide it for
passengers above 15,000 feet. Depending on their physical condition and
their aversion to risk, they may choose to use supplemental oxygen
at lower altitudes. Many recommend 10,000 feet in the daytime and even
lower at night. Because the onset of hypoxia is difficult to recognize,
pilots should never risk exceeding the altitudes specified in the
regulations.
Regulations require pilots to use oxygen after thirty minutes above
12,500 feet and all the time above 14,000 feet. They must provide it for
passengers above 15,000 feet. Depending on their physical condition and
their aversion to risk, they may choose to use supplemental oxygen
at lower altitudes. Many recommend 10,000 feet in the daytime and even
lower at night. Because the onset of hypoxia is difficult to recognize,
pilots should never risk exceeding the altitudes specified in the
regulations.
It is equally important to be sure the oxygen system you are using is
appropriate for the altitude at which you plan to fly, and that it is
working properly. Continuous flow systems, as the name implies, supply
oxygen continuously and thus wastes some. A rebreather mask helps conserve oxygen by reusing some of the exhaled oxygen that might otherwise be wasted. Continuous flow systems are the least expensive, however, and can be used up to 18,000 feet with a cannula and
25,000 with a mask.
Diluter demand systems sense altitude and supply the appropriate
amount of oxygen. They also provide oxygen only when the pilot inhales,
so they minimize waste. They are useful up to about 35,000 feet,
where they are supplying 100% oxygen to the pilot.
Since more than 100% oxygen is impossible, the only way to increase
its partial pressure at higher altitudes is to increase its total
pressure. Pressure demand systems supply oxygen to the mask at higher
than ambient pressures, and are useful up to about 45,000 feet. If you
are determined to go higher, you would be wise to invest in a
pressurized cabin aircraft.
A "bailout bottle" is usually carried on high altitude flights for use during a parachute descent. They also can be used as an emergency oxygen supply if needed.
Oxygen systems should be checked before flights where they may be needed. One memory aid for preflighting oxygen systems is PRICE:
-
P - for adequate PRESSURE
-
R - for REGULATOR check
-
I - for INDICATOR operation
-
C - for proper CONNECTIONS
-
E - for EMERGENCY bailout system.
To avoid the possibility of contamination, only aviation oxygen should be used in glider systems.
GYROSCOPIC INSTRUMENTS
HEADING INDICATOR
 Gyroscopic instruments are rare in U.S. gliders except motorgliders. The kinds that may be found are the heading indicator, the turn coordinator, and the attitude indicator. The heading indicator is based on the property of a gyroscope to remain in a fixed position (rigidity in space). It must be set to indicate direction based on the magnetic compass, since the heading indicator has no direction seeking ability of its own. The heading indicator will gradually drift off its initial setting, so the pilot must compare it with the magnetic compass and reset it as often as necessary.
|
|
TURN COORDINATOR
 The turn coordinator utilizes the gyroscopic principle of precession (when a force is applied to tilt the gyro's axis, it responds as if the force had been applied 90 degrees farther in the direction of rotation) to indicate the rate of turn of the glider. The turn coordinator is usually combined with an inclinometer. Although modern turn coordinators appear to indicate bank angle, they are really showing turn rate after the turn is established. The gyro axis is tilted so that it reacts to roll and thus indicates turn direction while rolling into a turn even before the heading starts to change.
|
|
ATTITUDE INDICATOR
 The attitude indicator, sometimes called an artificial horizon, utilizes the gyroscopic principle of rigidity in space to show pitch and bank attitudes. The gyroscope maintains the artificial horizon in the instrument parallel to the real horizon as the glider pitches or banks relative to it.
"An adjustment knob is provided with which the pilot may move the miniature airplane (C) up or down to align the miniature airplane with the horizon bar (B) to suit the pilot's line of vision.
The relationship of the miniature airplane to the horizon bar should be used for an indication of the direction of bank."
(8)
When the real horizon is not visible (as in a cloud) the pilot must have some gyroscopic reference available and know how to utilize it correctly to maintain control of the aircraft. Human body sensors often give dangerously erroneous signals in such situations.
The attitude indicator, sometimes called an artificial horizon, utilizes the gyroscopic principle of rigidity in space to show pitch and bank attitudes. The gyroscope maintains the artificial horizon in the instrument parallel to the real horizon as the glider pitches or banks relative to it.
"An adjustment knob is provided with which the pilot may move the miniature airplane (C) up or down to align the miniature airplane with the horizon bar (B) to suit the pilot's line of vision.
The relationship of the miniature airplane to the horizon bar should be used for an indication of the direction of bank."
(8)
When the real horizon is not visible (as in a cloud) the pilot must have some gyroscopic reference available and know how to utilize it correctly to maintain control of the aircraft. Human body sensors often give dangerously erroneous signals in such situations.
|
BAROGRAPH
A barograph is an instrument for recording pressure changes over time. Its application to glider flying is to record altitude continuously during flight. The resulting record, called a barogram, is used to document aspects of the flight, such as altitude gained, which are needed for verifying records or other accomplishments. Perhaps the most important thing for a pilot to remember about a barograph is to turn it on before flight.
ELECTRICAL SYSTEMS
Except for motorgliders, electrical systems in gliders usually consist of a rechargeable battery to operate radios and electrical instruments. Pilots should be familiar with the system in the glider they plan to utilize for the practical test.
LANDING GEAR
They also should be familiar with its landing gear. Retraction systems for gliders are usually simple manual systems. Brakes may be mechanically or hydraulically operated. Their actuation is frequently combined with the dive brake or spoiler control. Tires should be properly inflated.
PARACHUTES
 |
Parachutes are required for some glider operations and many pilots carry them all the time. Regulations require parachutes for maneuvers that result in bank angles of more than 60 degrees and pitch attitudes of more than 30 degrees up or down.
"No pilot of a civil aircraft may allow a parachute that is available for emergency use to be carried in that aircraft unless it is an approved type and-- If a chair type (canopy in back), it has been packed by a certificated and appropriately rated parachute rigger within the preceding 120 days."
(1) |
AVIONICS
Avionics equipment availability has exploded in recent years as capability increased and relative costs declined. However, many gliders have none and those that do usually have only a communications radio. As with other equipment, applicants for practical tests should be familiar with the avionics installed in the glider they plan to use for the test. They also should know the avionics requirements for entry into all types of airspace.
Despite limited use by most glider pilots, new practical test standards require radio communication competency to be demonstrated by the applicant under either actual or simulated conditions. In preparation for the practical test, applicants should become familiar with radio and light signal procedures.
LIGHT SIGNALS
| Air Traffic Control Tower Light Gun Signals
|
|---|
| COLOR AND TYPE OF SIGNAL
| AIRCRAFT ON THE GROUND
| AIRCRAFT IN FLIGHT
|
 Steady green Steady green
| Cleared for takeoff
| Cleared to land
|
 Flashing green Flashing green
| Cleared for taxi
| Return for landing (to be followed by steady green at the proper time
|
 Steady red Steady red
| STOP
| Give way to other aircraft and continue circling
|
 Flashing red Flashing red
| Taxi clear of runway in use
| Airport unsafe, do not land
|
 Flashing white Flashing white
| Return to starting point
| Not applicable
|
 Alternating red and green Alternating red and green
| Exercise extreme caution
| Exercise extreme caution
|
RADIO COMMUNICATION
Radio communication typically consists of four elements: whom you are calling, who you are, where you are (including altitude if in radar contact), and what you want (e.g. "Avra Valley UNICOM, Glider 1234Alpha, 10 miles south, Airport advisory".) When calling a ground station, use the call signs shown in the following table. When approaching an uncontrolled airport, position reports should be made to "traffic" (e.g. "Avra Valley traffic, Glider 1234Alpha, entering left downwind for runway 12, full stop landing.")
| Calling a Ground Station
|
|---|
| Facility
| Call Sign
|
| Airport UNICOM
| Shannon UNICOM
|
| FAA Flight Service Station
| Chicago Radio
|
| FAA Flight Service Station (En Route
Flight Advisory Service (Weather))
| Seattle Flight Watch
|
| Airport Traffic Control Tower
| Augusta Tower
|
| Clearance Delivery
| Dallas Clearance Delivery
|
| Ground Control Position in Tower
| Miami Ground
|
| Radar and Nonradar Approach Control Position
| Oklahoma City Approach
|
| Radar Departure Control Position
| St. Louis Departure
|
| FAA Air Route Traffic Control Center
| Washington Center
|
Most communication frequencies can be found on Sectional Charts. Others that glider pilots should know are 123.3 - glider air-to-ground, 122.0 - Flight Watch (Weather), 121.5 - Emergency, 122.75 air-to-air, 122.9 CTAF (Common Traffic Advisory Frequency) at uncontrolled airports without UNICOM.
Pilots should practice using the following phonetic alphabet terms until they are comfortable with saying, "niner".
"Up to but not including 18,000 feet MSL, state the separate digits of the thousands plus the hundreds if appropriate. Example: 12,500 - one two thousand five hundred."
(4)
PHONETIC ALPHABET
| Phonetic Alphabet
|
|---|
| CHARACTER
| TELEPHONY
| PHONIC
(PRONUNCIATION)
| CHARACTER
| TELEPHONY
| PHONIC
(PRONUNCIATION)
|
| A
| Alfa
| (AL-FAH)
| S
| Sierra
| (SEE-AIR-RAH)
| |
| B
| Bravo
| (BRAH-VOH)
| T
| Tango
| (TANG-GO)
|
| C
| Charlie
| (CHAR-LEE) or
(SHAR-LEE)
| U
| Uniform
| (YOU-NEE-FORM)
or (OO-NEE-FORM)
|
| D
| Delta
| (DELL-TAH)
| V
| Victor
| (VIK-TAH)
|
| E
| Echo
| (ECK-OH)
| W
| Whiskey
| (WISS-KEY)
|
| F
| Foxtrot
| (FOKS-TROT)
| X
| Xray
| (ECKS-RAY)
|
| G
| Golf
| (GOLF)
| Y
| Yankee
| (YANG-KEY)
|
| H
| Hotel
| (HOH-TEL)
| Z
| Zulu
| (ZOO-LOO)
|
| I
| India
| (IN-DEE-AH)
| 1
| One
| (WUN)
|
| J
| Juliett
| (JEW-LEE-ETT)
| 2
| Two
| (TOO)
|
| K
| Kilo
| (KEY-LOH)
| 3
| Three
| (TREE)
|
| L
| Lima
| (LEE-MAH)
| 4
| Four
| (FOW-ER)
|
| M
| Mike
| (MIKE)
| 5
| Five
| (FIFE)
|
| N
| November
| (NO-VEM-BER)
| 6
| Six
| (SIX)
|
| O
| Oscar
| (OSS-CAH)
| 7
| Seven
| (SEV-EN)
|
| P
| Papa
| (PAH-PAH)
| 8
| Eight
| (AIT)
|
| Q
| Quebec
| (KEH-BECK)
| 9
| Nine
| (NIN-ER)
|
| R
| Romeo
| (ROW-ME-OH)
| 0
| Zero
| (ZEE-RO)
|
If you are operating from an airport with a control tower in operation, your
outbound communications will usually be first listen to ATIS, next Clearance Delivery
if so indicated by ATIS before calling Ground Control for taxi clearance, and finally
the Tower for takeoff clearance. Be sure to tell the tower your location, e.g.
at the end of the runway or at an intersection when you call.
Inbound aircraft should listen to ATIS before contacting any controller. Then
they need to contact Approach Control before entering Class B or Class C
airspace, where they will be instructed when to contact the Tower. Before entering Class D
airspace, or within 4 NM of an airport in Class E or G airspace, they must contact the Tower.
After landing they should contact Ground Control when advised to do so by the Tower.
If you must land at a controlled airport without radio communication, remain outside the
area until you can determine the direction and flow of the traffic before joining the pattern.
Then watch the tower for light signals.
It is important to let people know where you are and what your intentions are when operating
at an airport without a control tower:
- OUTBOUND: Before taxiing and before taxiing on the runway for departure.
- INBOUND: 10 miles out, entering downwind, base, and final, and leaving the runway.
If the airport has no tower, FSS, or UNICOM, self announce on MULTICOM, 122.9.
If it has only UNICOM, communicate with the station. If unable then self announce
on the CTAF frequency.
If there is no tower in operation but the FSS is open, communicate with FSS on the CTAF frequency.
If neither tower nor FSS are in operation, self announce on CTAF.
RADIO NAVIGATION
GLOBAL POSITIONING SYSTEM (GPS)
For most glider pilots, the only radio navigation they may have occasion to use is the Global Positioning System (GPS). "GPS is a United States satellite-based radio navigational, positioning, and time transfer system operated by the Department of Defense."(4) It utilizes a constellation of 24 satellites, designed so that at least five are always observable. At least four are required to provide latitude, longitude and altitude for the observer.
 A GPS receiver determines its distance from each observable satellite by measuring the time it takes for a radio signal from the satellite to reach the receiver. For a single satellite, that distance represents the radius of a sphere. The receiver could be anywhere on the spherical surface. The intersection of two spheres is a circle, and the receiver's location is now reduced to somewhere on that circle. A third sphere narrows location down to two points. If one of those points is on the earth and the other is far out in space, a glider pilot can be reasonably sure which one represents his/her location, but to know altitude as well as latitude and longitude, the pilot needs the fourth satellite. Of course, the receiver must know where the satellites are for this to work.
The result of these calculations is often presented as latitude and longitude of the receiver. If the latitude and longitude of some other point (such as the destination airport) is also known, its distance and direction from the receiver can be calculated. If the receiver's position a short time ago was saved, then its direction of movement and speed since that last observation is also easily calculated. Users of GPS systems usually have a choice of several ways to display this information, including a moving map that may show the aircraft's position relative to airports and airspace of interest, limited only by the contents of the receiver's data base.
That seems like a lot to expect from a small hand-held device, but there is more. Because the GPS system is complex, there always exists the possibility of error. "A GPS receiver verifies the integrity of the signals received from the GPS constellation through receiver autonomous integrity monitoring (RAIM) to determine if a satellite is providing corrupted information. Without RAIM capability, the pilot has no assurance of the accuracy of the GPS position."(4)
AUTOMATIC DIRECTION FINDER (ADF)
If you fly a powered glider it may include automatic direction finder (ADF) radio navigation capability. If you do not, you may want to become familiar with the system anyway, to be ready for any questions that may be on your knowledge test. To use the airborne ADF equipment it must be tuned to a ground station known as a nondirectional radio beacon (NDB). A search of your sectional chart will not find a lot of NDBs, but you may find a few AM commercial broadcast stations that work just as well.
The ADF navigation display in the aircraft is a circular dial that looks like a compass rose and a needle that rotates to indicate where the station is, relative to the aircraft. If the instrument were mounted horizontally, the needle would point to the station. Since the instrument is mounted vertically like all the other instruments, you need to use a little imagination, but not much. If the needle points straight up, the station is straight ahead. If it points straight down, the station is directly behind. Right and left require no imagination whatsoever.
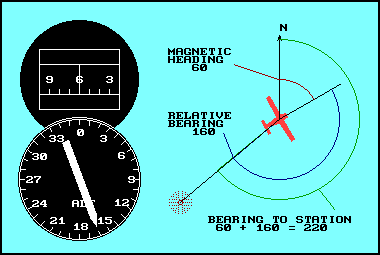 To understand ADF you need to understand three angles. The first is Magnetic Heading - the direction the aircraft is pointing, relative to magnetic north. The second is Relative Bearing - the value indicated on the ADF instrument. It is the angle between the nose of the aircraft and the NDB to which the ADF is tuned. The third is Magnetic Bearing TO the station - the magnetic direction from your present location to the NDB. Since all three angles are measured in a clockwise direction, Magnetic Bearing TO is the sum of Magnetic Heading and Relative Bearing. Occasionally you may want to know the Magnetic Bearing FROM the station (perhaps because the test question wants to know). If so, determine the Magnetic Bearing TO, as just described, and add or subtract 180o.
An observant student may have noticed that if the navigation display "card" could be rotated so that the Magnetic Heading is at the top, then the Magnetic Bearing TO the station could be read directly from the instrument. Some ADFs have movable cards and some have fixed cards. Many of the knowledge test questions appear to be based on the fixed card, but if the illustration in the referenced figure has any number other than zero at the top, it is a movable card ADF and the value under the pointer is Magnetic Bearing TO the station. The question in this case is likely to be "What is the Relative Bearing?" The answer would be the Magnetic Bearing TO the station minus the Magnetic Heading.
VERY HIGH FREQUENCY OMNI-DIRECTIONAL RANGE (VOR)
The most popular radio navigation system prior to the advent of GPS was the very high frequency omnidirectional range (VOR). This system, too, is extremely rare in unpowered gliders, but applicants should be prepared for a few questions on the knowledge test.

 VOR ground stations are shown on sectional charts by one of these symbols at the center of a compass rose oriented to magnetic north. VORTAC and VOR-DME include support for equipment capable of measuring the distance to the station, which will not be discussed here. All three types provide directional information. The compass rose may be omitted in highly congested areas. Somewhere near the symbol for the station will be a box that contains at least the station name, frequency, and its Morse code identification. The Morse code is transmitted to ensure positive identification of the station. Numbers above the box are communication frequencies, and the letter "T" or "H" in the upper right corner indicates availability of transcribed weather information.
The radio signal transmitted by the station can be visualized as 360 separate signals, one for each degree of magnetic direction. These are radials, and by definition, radiate FROM the station. If you are flying 90o TO the station, you are on the 270o RADIAL.
The VOR navigation display in the aircraft contains three essential components. First is the Course that has been selected by the omnibearing selector (OBS), a small knob usually on the lower left side of the instrument. The Course is shown at the top of the instrument in typical compass format in which only 30o increments are given in numeric form with the last digit missing (e.g. 15 = 150o). Somewhat lower in the instrument is the TO-FROM indicator that indicates whether the presently selected course will take you TO or FROM the station. The last component is the course deviation indicator (CDI) needle, which, when centered, indicates that the aircraft is precisely on the selected course. Full-scale deflection of the needle indicates that the aircraft is at least 10o off course. In our examples and on the test the aircraft will be either on course or off by more than 10o.
Unlike the ADF described earlier, the VOR is TOTALLY INDEPENDENT OF THE DIRECTION THE AIRCRAFT IS POINTED. Read that again. When used correctly, the CDI needle indicates where the course line is, relative to the aircraft. If the needle is to the right, the course is to the right. But if you turn the aircraft around, the needle still indicates right, but the course is now on your left. To avoid this confusion, mentally turn the aircraft to the heading indicated by the selected course before trying to relate the CDI indication to the location of the course, relative to the aircraft.
 Orientation relative to a VOR station can be facilitated by drawing (mentally or otherwise) an arrow through the VOR station, pointing in the direction indicated by the course that has been selected. Then draw another line perpendicular to the arrow and through the station. This divides the world into four quadrants, relative to the VOR station. In our illustration, the yellow quadrants represent areas that are FROM the station and the TO-FROM indicator will so indicate for all aircraft in those quadrants, regardless of the direction they are pointed. Similarly, all aircraft in the green quadrants will indicate TO.
Any aircraft to the left of the arrow, when viewed in the direction the arrow is pointing, will have a right indication by the CDI needle, and any aircraft to the right of the arrow will have a left indication, regardless of the direction the aircraft is pointed. If the aircraft is directly on the arrow, the CDI needle will be centered.
When the aircraft crosses the line perpendicular to the course arrow, the TO-FROM flag changes from one to the other. In our examples and on the test, that transition is indicated by a blank TO-FROM flag. Since it is virtually impossible to fly directly over the station, and since the angular error approaches 90o when you try, the CDI needle will show full-scale deflection as the TO-FROM flag changes. The direction of deflection is the same as any other time the aircraft is not precisely on course. To answer the test questions correctly, mentally turn the aircraft to the course heading and determine if the needle would be deflected right or left. That determines the answer regardless of the direction the aircraft is actually pointed.
When a VOR is down for maintenance it will delete the Morse code identifier or transmit TEST instead.
To check your aircraft VOR receiver for accuracy, tune to a local VOT and center the CDI. The OBS should indicate 180o TO the station or 0o FROM.
TRANSPONDER
There are very few places you can fly without being on someone's radar screen. Primary
radar sees you as a result of the signal being reflected off your airplane. Modern
radar picks up just about every type of aircraft except some military aircraft
designed to avoid detection. Primary radar can't tell one airplane from another or
the altitude at which it is flying unless the controller is talking to the pilot.
Transponders are a sort of automatic communication with the controller by sending
back an identifying signal, and usually altitude as well.
FAR 91.215 requires transponders with altitude reporting (Mode C) to be installed in
all aircraft operating in Class A, Class B, and Class C airspace, and above Class B
and Class C up to 10,000 feet MSL. Except for aircraft
without engine driven electrical systems and specifically gliders and balloons, they are also required within the 30 NM
"Veil" around Class B airports, and above 10,000 feet MSL (and above 2,500 feet AGL)
anywhere within the 48 contiguous
states. FAR 91.413 requires transponders to be inspected every 24 months.
RADAR TRAFFIC ADVISORIES
Radar services are available to VFR pilots both en route and in terminal areas. These
services may include Safety Alerts (Terrain/Obstruction or Aircraft Conflict), Traffic Advisories, Radar Vectoring, and
Sequencing. They may be provided when requested by the pilot, and are mandatory in
Class C and Class B airspace. Arriving pilots should contact approach control for
services and departing aircraft should make their requests to ground control on
initial contact.
 |
Air traffic controllers will provide the four-digit code to be set in the transponder
by stating, "Squawk (number)." The VFR code to be used otherwise is 1200. 7700 is used
for emergencies, 7600 for loss of communications, and 7500 for being hijacked. When
changing codes, pilots should be careful not to pass through any of these codes.
Pilots can receive a lot of assistance from controllers, especially with respect to
finding traffic that may constitute a hazard. Controllers will give the direction
of the traffic from your airplane in terms of a horizontal clock, with 12 o'clock
straight ahead. You should remember, though, that
the controller sees only your direction of flight (shown by the yellow arrow in the
illustration), not your heading. The green airplane is at your 2 o'clock position,
even if you are crabbing 30o right or left. |
EMERGENCY LOCATOR TRANSMITTER (ELT)
Most airplanes are required to have an ELT installed to aid in search and rescue
operations by transmitting a signal on 121.5 MHz and 243.0 MHz when activated by
crash generated forces. Exceptions include gliders, single pilot airplanes, training flights
within 50 NM of base, and some test and ferry uses. FAR 91.207 requires the ELT to be
inspected every 12 months, and its battery to be replaced after one hour of cumulative
use or 50% of its useful life has expired. Pilots are encouraged to monitor 121.5 MHz
when practical to do so in flight, and just prior to engine shut down to check for
a real emergency or a false alarm (perhaps from your own ELT.) If you want to test your
ELT, do so during the first 5 minutes of the hour.
© 2005 Jim D. Burch 602-942-2734
jdburch@att.net
To return to table of contents select TOC