AIRPORTS
Glider pilots have several ways to get information about an airport they may want to use. One is simply to look at it. This method is especially useful when the pilot decides to make an unplanned landing at an airport along the route of flight.
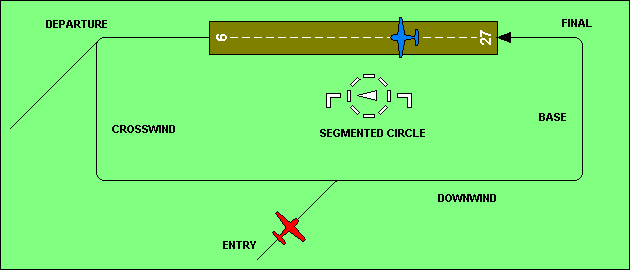 By over flying the airport, the pilot can observe the segmented circle to determine the correct pattern to fly. At the center of the circle is the landing direction indicator. The one illustrated here is called a tetrahedron and sometimes can be set manually when the preferred runway does not agree with the wind direction. Other times the tetrahedron may be allowed to align freely with the wind direction as windsocks and other devices do. The "L" shaped markers on either side of the circle indicate the traffic pattern that applies for the runway in use. The indicator can be visualized as the base and final approach legs of the pattern. The illustration shows left traffic for runway 27 and right traffic for runway 9. This arrangement might be used because of a noise sensitive area just north of the airport. Left turns are standard when there are no indications otherwise. The recommended entry to the traffic pattern is along a 45o angle to the downwind leg. Departures must conform to any pattern established for the airport.
Our illustration shows a blue airplane in the pattern practicing touch and goes, and a red one who is entering and leaving the pattern. A glider pilot joining this mix should do so with minimum interference to existing traffic.
By over flying the airport, the pilot can observe the segmented circle to determine the correct pattern to fly. At the center of the circle is the landing direction indicator. The one illustrated here is called a tetrahedron and sometimes can be set manually when the preferred runway does not agree with the wind direction. Other times the tetrahedron may be allowed to align freely with the wind direction as windsocks and other devices do. The "L" shaped markers on either side of the circle indicate the traffic pattern that applies for the runway in use. The indicator can be visualized as the base and final approach legs of the pattern. The illustration shows left traffic for runway 27 and right traffic for runway 9. This arrangement might be used because of a noise sensitive area just north of the airport. Left turns are standard when there are no indications otherwise. The recommended entry to the traffic pattern is along a 45o angle to the downwind leg. Departures must conform to any pattern established for the airport.
Our illustration shows a blue airplane in the pattern practicing touch and goes, and a red one who is entering and leaving the pattern. A glider pilot joining this mix should do so with minimum interference to existing traffic.
Sectional and other aeronautical charts provide a lot of information about airports. Pilots should become familiar with the information shown in the chart legend. Applicants for private pilot knowledge tests will find a copy of the legend in the materials supplied when they take the test. Commercial and flight instructor candidates apparently are expected to have that information committed to memory. Airports with control towers are shown in blue; others are shown in magenta. Hard surfaced runway patterns are shown to assist in identifying airports and orienting pilots. Smaller airports may be shown simply as a circle. If the circle contains the letter "R" it is a non-public use airport.
 Airport information shown here includes the tower frequency (CT), an asterisk indicating that it is a part time tower, and the letter "C" in a blue circle indicating that the tower frequency is the "Common Traffic Advisory Frequency" (CTAF) to be used when the tower is closed. ATIS, Automatic Terminal Information Service, frequency is also shown.
"ATIS information includes the time of the latest weather sequence, ceiling, visibility, obstructions to visibility, temperature, dew point, wind direction (magnetic), and velocity, altimeter, other pertinent remarks, instrument approach and runway in use."
(4)
If the letters "FSS" appear above the airport name a flight service station is located on the field. When there is no tower or the tower is not operating at such airports, the FSS provides advisory service to arriving and departing aircraft in an airport advisory area within 10 SM of the airport.
"In communicating with a CTAF FSS, establish two-way communications before transmitting outbound/inbound intentions or information. An inbound aircraft should report approximately 10 miles from the airport, reporting altitude and aircraft type, location relative to the airport, state whether landing or over flight, and request airport advisory."
(4)
Airport information shown here includes the tower frequency (CT), an asterisk indicating that it is a part time tower, and the letter "C" in a blue circle indicating that the tower frequency is the "Common Traffic Advisory Frequency" (CTAF) to be used when the tower is closed. ATIS, Automatic Terminal Information Service, frequency is also shown.
"ATIS information includes the time of the latest weather sequence, ceiling, visibility, obstructions to visibility, temperature, dew point, wind direction (magnetic), and velocity, altimeter, other pertinent remarks, instrument approach and runway in use."
(4)
If the letters "FSS" appear above the airport name a flight service station is located on the field. When there is no tower or the tower is not operating at such airports, the FSS provides advisory service to arriving and departing aircraft in an airport advisory area within 10 SM of the airport.
"In communicating with a CTAF FSS, establish two-way communications before transmitting outbound/inbound intentions or information. An inbound aircraft should report approximately 10 miles from the airport, reporting altitude and aircraft type, location relative to the airport, state whether landing or over flight, and request airport advisory."
(4)
The frequency 122.95 is the UNICOM frequency at airports with towers. At non-tower airports UNICOM is used for airport advisories.
 One good way to provide unambiguous information about your location is to use a visual checkpoint, identified by a magenta flag. If you are unfamiliar with the area and can't find a checkpoint, don't hesitate to inform the person to whom you are talking.
Another source of information about airports available to pilots is the Airport/Facility Directory (A/FD). A multipage legend for this document is provided for Private Pilot test applicants. A few of the references that may appear on tests are:
- Airport location is shown as distance in NM and direction from the city as "4 NE"
- Hours of operation are shown in UTC, with the conversion to local time in parenthesis - "UTC-5(-4DT)".
- Threshold crossing height is shown as "TCH 37'".
- Runway slope is shown if it is 0.3 percent or greater.
- Right traffic is indicated as "Rgt tfc".
-
"Remarks-Data is confined to operational items affecting the status and usability of the airport. Parachute Jumping - See "PARACHUTE" tabulation for details."
(13)
- Site elevation and magnetic variation for navigation aids is shown as "1110/8E".
COLLISION AVOIDANCE AND AIRSPACE
 Regulations say we should all "see and avoid" each other when we are
flying in visual meteorological conditions. That isn't as easy as it
sounds. Only 5% of mid-air
collisions are head-on. Most involve one aircraft overtaking another in good weather, daylight conditions.
Since gliders are usually the slower aircraft, that suggests that our
greatest threat is not where we are likely to be looking when flying
straight. The situation is no better when we are circling in a thermal.
Because our area of sharp vision is only about ten degrees wide, the
recommended method of scanning for traffic is to divide the area into
ten-degree segments and examine each for at least one second. That would
require that we examine 36 ten-degree segments at one second each for
a total of 36 seconds. But it only takes about 16 seconds to complete
a circle when thermalling at a 45-degree bank. That means we'd better
be looking at the segment where the traffic is if we expect to see it.
The AIM recommends gentle turns, left and right, when climbing or descending to facilitate visual scanning for traffic.
That doesn't fit very well with most glider flights, but the idea of looking for traffic applies whether
you are climbing in a thermal or trying to get back to the airport.
"Any aircraft that appears to have no relative motion and stays in one scan quadrant is likely to be on a collision course. Also, if a target shows no lateral or vertical motion, but increases in size, take evasive action."
(4)
Regulations say we should all "see and avoid" each other when we are
flying in visual meteorological conditions. That isn't as easy as it
sounds. Only 5% of mid-air
collisions are head-on. Most involve one aircraft overtaking another in good weather, daylight conditions.
Since gliders are usually the slower aircraft, that suggests that our
greatest threat is not where we are likely to be looking when flying
straight. The situation is no better when we are circling in a thermal.
Because our area of sharp vision is only about ten degrees wide, the
recommended method of scanning for traffic is to divide the area into
ten-degree segments and examine each for at least one second. That would
require that we examine 36 ten-degree segments at one second each for
a total of 36 seconds. But it only takes about 16 seconds to complete
a circle when thermalling at a 45-degree bank. That means we'd better
be looking at the segment where the traffic is if we expect to see it.
The AIM recommends gentle turns, left and right, when climbing or descending to facilitate visual scanning for traffic.
That doesn't fit very well with most glider flights, but the idea of looking for traffic applies whether
you are climbing in a thermal or trying to get back to the airport.
"Any aircraft that appears to have no relative motion and stays in one scan quadrant is likely to be on a collision course. Also, if a target shows no lateral or vertical motion, but increases in size, take evasive action."
(4)
FAR 91.111 says no person may operate an aircraft so close to another aircraft as to
create a collision hazard. That doesn't rule out formation flight
provided the pilots involved have made arrangements to do so, but they
cannot carry passengers for hire.
RIGHT-OF-WAY
FAR 91.113 defines the right-of-way of aircraft converging other than
head-on in the following descending order by category:
- Balloon
- Glider
- An aircraft towing or refueling other aircraft
- Airship
- Powered Parachute
- Weight-Shift-Control Aircraft
- Airplane
- Rotorcraft
If the converging aircraft are of the same category, the aircraft to the
other's right has the right-of-way.
As you probably guessed, an aircraft in distress has the right-of-way
over all other air traffic. Overtaking aircraft pass to the right,
and aircraft converging head-on both alter course to the right.
When two or more aircraft are approaching an airport for the purpose
of landing, the aircraft at the lower altitude has the right-of-way,
but it shall not take advantage of this rule to cut in front of
another which is on final approach (FAR 91.113).
Despite the limitations of "see and avoid", maybe there are some things we can
do to improve our chances of success. One is to know where traffic is
more likely to be and avoid those areas when it is reasonable to do so.
If it is not, then at least exercise extra caution. Some of the places
where airplanes are more likely to be include airports and airways for
civilian aircraft and special use airspace and Military Training
Routes for military aircraft. In the following table we show examples
of these along with some of the restrictions and precautions related
to their use.
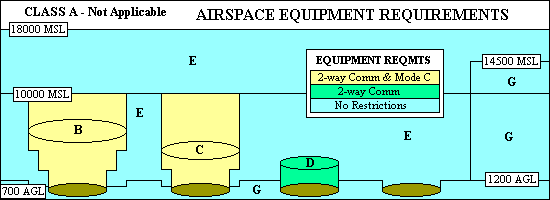
CLASS A AIRSPACE
Class A airspace, from 18,000 feet MSL up to and including FL600, is generally restricted to IFR operations, requiring altitude reporting transponders and an ATC clearance. There is an exception for gliders operating in a "wave window" that has been previously negotiated with ATC and approved for the time of use. In that case the only likely traffic hazard would be another glider.
CLASS B AIRSPACE
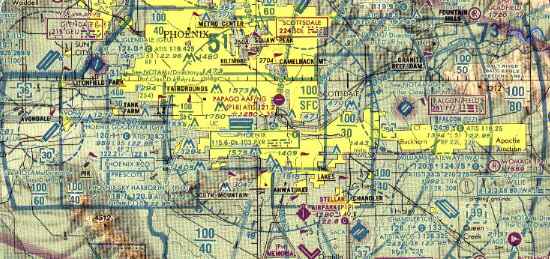 Class B airspace is the most restrictive for glider pilots, and is
usually the most complex. In this partial view of PHX you can see
the different shapes and altitudes of different segments.
Entry requires a clearance (ergo two-way communication) and a Mode C
transponder with altitude encoding. Gliders are exempt from the Mode C
requirement within the 30 NM Mode C Veil, but not within Class B
airspace nor above its ceiling (or the ceiling of Class C airspace within
the Mode C Veil) to 10,000 feet MSL. Pilots operating within the Class B
airspace must have at least a private pilot certificate, or if a student,
recreational, or sport pilot, they must have received training in that Class B
airspace and have their logbook so endorsed within the past 90-days. There are
some Class B airports for which the student/recreational/sport pilot operations are
not allowed. Sport pilots and student pilots training to be sport pilots require
similar training and endorsements to operate in Class C and Class D airspace
and to any airport with a control tower.
Class B airspace is the most restrictive for glider pilots, and is
usually the most complex. In this partial view of PHX you can see
the different shapes and altitudes of different segments.
Entry requires a clearance (ergo two-way communication) and a Mode C
transponder with altitude encoding. Gliders are exempt from the Mode C
requirement within the 30 NM Mode C Veil, but not within Class B
airspace nor above its ceiling (or the ceiling of Class C airspace within
the Mode C Veil) to 10,000 feet MSL. Pilots operating within the Class B
airspace must have at least a private pilot certificate, or if a student,
recreational, or sport pilot, they must have received training in that Class B
airspace and have their logbook so endorsed within the past 90-days. There are
some Class B airports for which the student/recreational/sport pilot operations are
not allowed. Sport pilots and student pilots training to be sport pilots require
similar training and endorsements to operate in Class C and Class D airspace
and to any airport with a control tower.
 | The ceilings and floors of segments of Class B and Class C airspace are depicted as shown here on aeronautical charts.
|
|
ARRIVAL AND DEPARTURE ROUTES
 Perhaps the most serious collision risk for gliders operating near busy
commercial airports involves airplanes approaching and departing the airports on
Arrival and Departure Routes. A collision involving a glider and an air
carrier would likely be fatal to the sport of soaring as well as the
people involved. Arrival and Departure Routes are not shown on any charts normally used by
glider pilots except for the symbol shown here from an Area Chart.
Perhaps the most serious collision risk for gliders operating near busy
commercial airports involves airplanes approaching and departing the airports on
Arrival and Departure Routes. A collision involving a glider and an air
carrier would likely be fatal to the sport of soaring as well as the
people involved. Arrival and Departure Routes are not shown on any charts normally used by
glider pilots except for the symbol shown here from an Area Chart. |
CLASS C AIRSPACE
 From the glider pilot's perspective, Class C is not significantly
different from Class B. Two-way communication is required for entry,
but not specifically a "clearance", and Mode C transponder with
altitude encoding is required in and above Class C up to 10,000 feet
MSL. This illustration shows two overlapping Class C areas.
From the glider pilot's perspective, Class C is not significantly
different from Class B. Two-way communication is required for entry,
but not specifically a "clearance", and Mode C transponder with
altitude encoding is required in and above Class C up to 10,000 feet
MSL. This illustration shows two overlapping Class C areas.
Class C airspace usually consists of a 5 NM radius core that extends from the surface to 4,000 feet above the airport elevation and a 10 NM radius shelf area that extends from 1,200 feet to 4,000 feet above the airport elevation. The outer area associated with Class C airspace usually has a radius of 20 NM.
|
|
CLASS D AIRSPACE
 Two-way communication is normally required for entry into Class D
airspace. The Aeronautical Information Manual recommends the initial
call be made 15 miles out. The tower frequency is shown on the chart
after the letters "CT". Class D airspace usually extends from the
surface to 2,500 feet AGL, but in this case overlying airspace restricts
the top to 4,200 feet MSL, shown in the small box as "-42".
"When overlapping airspace designations apply to the same airspace, the operating rules associated with the more restrictive airspace designation apply."
(4)
Two-way communication is normally required for entry into Class D
airspace. The Aeronautical Information Manual recommends the initial
call be made 15 miles out. The tower frequency is shown on the chart
after the letters "CT". Class D airspace usually extends from the
surface to 2,500 feet AGL, but in this case overlying airspace restricts
the top to 4,200 feet MSL, shown in the small box as "-42".
"When overlapping airspace designations apply to the same airspace, the operating rules associated with the more restrictive airspace designation apply."
(4)
A person departing another airport within Class D airspace is required to establish communications with the responsible ATC facility as soon as practicable.
When the tower at the Class D airport is not in operation, the
airspace rules revert to Class E or Class G, depending
on the surrounding airspace. Check the Airport/Facilities Directory for specifics.
|
|
CLASS E AIRSPACE
 Communication generally is not required for operations in Class E airspace, but
the Aeronautical Information Manual recommends "self-announcing" to
other traffic 10 miles out and entering downwind, base and final when
landing at a non-tower airport. The common traffic advisory frequency,
CTAF, is indicated on the chart by the letter "C" enclosed in a
solid colored circle.
Communication generally is not required for operations in Class E airspace, but
the Aeronautical Information Manual recommends "self-announcing" to
other traffic 10 miles out and entering downwind, base and final when
landing at a non-tower airport. The common traffic advisory frequency,
CTAF, is indicated on the chart by the letter "C" enclosed in a
solid colored circle. |
 Class E airspace includes all airspace in the contiguous states from 14,500 feet MSL to 18,000 feet MSL. In most of the U.S. Class E begins much lower. The floor is usually either 700 feet AGL or 1,200 feet AGL, indicated by magenta or blue shading respectively on aeronautical charts.
If an airport in Class E airspace has a control tower, the airspace within 4 NM of the airport and up to 2,500 feet AGL must be treated as if it were Class D airspace.
Airports with control towers are shown on charts in blue; others are shown in magenta.
Class E airspace includes all airspace in the contiguous states from 14,500 feet MSL to 18,000 feet MSL. In most of the U.S. Class E begins much lower. The floor is usually either 700 feet AGL or 1,200 feet AGL, indicated by magenta or blue shading respectively on aeronautical charts.
If an airport in Class E airspace has a control tower, the airspace within 4 NM of the airport and up to 2,500 feet AGL must be treated as if it were Class D airspace.
Airports with control towers are shown on charts in blue; others are shown in magenta.
|
|
VICTOR AIRWAYS AND MTRS
 Victor Airways, V-16 in this illustration, are shown in blue on
aeronautical charts. They are based on VOR navigation facilities, and
are used primarily by general aviation pilots. Federal airways are Class E airspace and usually extend from 1,200 feet AGL up to but not including 18,000 feet MSL and 4 NM either side of their centerline.
Victor Airways, V-16 in this illustration, are shown in blue on
aeronautical charts. They are based on VOR navigation facilities, and
are used primarily by general aviation pilots. Federal airways are Class E airspace and usually extend from 1,200 feet AGL up to but not including 18,000 feet MSL and 4 NM either side of their centerline.
Military Training
Routes (MTRs) are shown in gray, with the letters "VR" or "IR",
indicating visual or instrument routes, followed by the route number. If the route number contains four digits, the route has no segment above 1,500 feet AGL. Those that do contain segments higher than 1,500 feet AGL have three digit identifiers.
Glider pilots should be alert for high-speed military aircraft along
these routes. Planned activity can be obtained from Flight Service.
|
MILITARY OPERATIONS AREAS

Military Operations Areas (MOAs) have a magenta crosshatched border. Information
about their times of use and the applicable altitudes can be found on
the border of the chart. They are established to separate military training that may involve unusual flight maneuvers from IFR traffic. No clearance is necessary for VFR operation in
MOAs, but glider pilots should exercise caution when the area is active. Traffic advisories can be obtained from the controlling agency.
|
|
RESTRICTED AREAS
 Restricted Areas, shown on charts with a blue crosshatched border,
require a clearance to enter during times of use. Times and altitudes
are shown on the chart border, along with the controlling agency. It
will usually be easier for glider pilots to obtain information about
restricted areas by contacting Flight Service. Restricted areas may contain extremely hazardous activities. Similar areas extending from three nautical miles outward from the U.S. coast are called "Warning Areas".
Restricted Areas, shown on charts with a blue crosshatched border,
require a clearance to enter during times of use. Times and altitudes
are shown on the chart border, along with the controlling agency. It
will usually be easier for glider pilots to obtain information about
restricted areas by contacting Flight Service. Restricted areas may contain extremely hazardous activities. Similar areas extending from three nautical miles outward from the U.S. coast are called "Warning Areas".
|
ALERT AREAS

Alert Areas are depicted with blue crosshatched borders. That is
difficult to see in this illustration because most of the Alert Area's
border coincides with the magenta boundary of Class E airspace
beginning at 700 feet AGL. Alert
Areas, like MOAs, require no clearance, but extra caution is
advised. All pilots share responsibility for collision avoidance.
|
TEMPORARY FLIGHT RESTRICTIONS (TFR)
The location and applicable restrictions for TFRs are documented in NOTAMs.
Because they are temporary, they do not appear on typical aeronautical
charts. They are frequently used to protect public figures.
Their use has become more common due to concerns about terrorism.
Pilots should check with Flight Service before every flight to determine
if any TFRs could affect their plans.
AIR DEFENSE IDENTIFICATION ZONES (ADIZ)
ADIZ have been established to identify aircraft approaching U.S.
airspace. They can also be used within U.S. airspace. Generally, a flight plan,
two-way radio, and Mode C transponder are required for entry into an
ADIZ.
INTERCEPTION PROCEDURES
If you should find yourself in airspace that you should not have entered
you might get a visit from two military aircraft, one along side and the
other behind you. If the one along side rocks his/her wings and turns slowly away,
that means you should also rock your wings and follow. If the military
plane does not rock its wings and does turn away abruptly, you can continue.
If you are required to follow, the military plane will make a low pass over an
airport with its gear extended. That means you are supposed to land there,
where you will be asked a lot of questions.
AIRSPACE EQUIPMENT REQUIREMENTS
Most of the practical test failures related to airspace are because of
the inability to correctly identify airspace on a Sectional Chart and/or
know the restrictions applicable to that airspace. U.S. airspace,
other than special use airspace, is divided into six classes, A through
G (there is no Class F in the U.S.). Class A, starting at 18,000 feet MSL,
is available for glider flights only by prearrangement for a "wave
window". Class B and C require altitude encoding transponders in and
above up to 10,000 feet MSL, and
two-way communication, and Class D usually requires only communication.
Gliders can fly in most of Class E and Class G with no restrictions at all, except
that Sport Pilots are not allowed to fly above 10,000 feet MSL.
VFR VISIBILITY AND CLOUD CLEARANCE REQUIREMENTS
Since most glider operations in the U.S. are conducted in visual
meteorological conditions, pilots need to be aware of the
visibility and cloud clearance minimums for legal VFR flight.
These minimums are established to help give pilots the opportunity to
"see" other aircraft in time to "avoid" them.
When you
consider that there are six airspace classes, three visibility minimums,
and three cloud clearance minimums, keeping them all straight seems
like a formidable task. It gets a little easier when you recognize
that there are only five combinations of visibility and cloud
clearance, and two of those have unique application. Five-mile
visibility and cloud clearance of 1,000 ft below, 1,000 ft above and
1 mile horizontally applies to everything above 10,000 ft MSL all the
time. Three-mile visibility and clear of clouds applies to Class B all
the time. At night, everything else is three miles visibility and cloud
clearance of 500 ft below, 1,000 ft above and 2,000 ft horizontally.
(Night, unless otherwise defined in a regulation, means "the time between
the end of evening civil twilight and the begining of morning civil twilight."(1))
In the daytime, Class G visibility below 10,000 MSL drops to one
mile, and below 1,200 ft AGL cloud clearance becomes clear of clouds.

FAR 61.89 further restricts Student Pilots to three mile visibility
during the day and five miles at night. Sport Pilots are also restricted to
three mile visibility including "visual reference to the surface,"
and they cannot fly at night. FAR 91.155 permits flight at night in Class G airspace
with 1 mile visibility and clear of clouds below 1,200 ft if operated in an
airport traffic pattern within one-half mile of the runway.
VFR takeoffs and landings
within the surface areas of Class B, Class C, Class D, or Class E
airspace designated for an airport require ground visibility at least
3 statute miles and a ceiling of at least 1,000 feet.
However, FAR 91.157 permits Special VFR operations within the surface
area of such airports up to 10,000 MSL, with 1-mile visibility and clear
of clouds, when approved by ATC, unless the letters "NO SVFR" appear above the airport
name on the aeronautical chart. Special VFR between sunset and sunrise requires
that the aircraft and pilot be IFR certified.
CLEARING TURNS
 |
There is a lot pilots should know about airspace and minimums and
equipment requirements, but by far the most practical test failures
related to collision avoidance are simply due to failure to make a
clearing turn before demonstrating a stall. Many instructors teach
students to make two 90-degree turns prior to any maneuver. The number
of degrees turned is far less important than checking to see that
the airspace you will be occupying during the maneuver will not also
be occupied by someone else. Visibility
from the front seat of a trainer such as the Schweizer SGS 2-33 is
pretty good just about everywhere except behind and below, but you
need to make a turn to check there. |
AIRPORT MARKING AND LIGHTING
Although many glider pilots fly from airports with little or no airport marking and lighting, they may want to visit a more sophisticated airport some day, so we will discuss the essential things they need to know. One possible scenario is when the pilot gets low on a cross-country and has no suitable alternative. Even if the airport has a control tower and the glider has no radio, a landing can be made without too much disruption to the normal airport operations if the glider pilot knows the rules.
As you approach a controlled airport without radio communication you should remain outside the pattern until you have determined the direction and flow of traffic. Then join the pattern and expect to receive light signals from the tower. Similar signals are used for departing aircraft if radio contact is not possible. If it has been a long time since you took the FAA knowledge test before you have an occasion to use light signals, your memory of their meaning may become a little fuzzy. Try to remember, at least, that red and green have meanings similar to those you recognized on the drive to the airport. If you get a steady red light on final approach, the controller may be trying to tell you that the runway is not the best place for you to land. Since you must land anyway, maybe a taxiway or other open area would be a better choice.
 You will find markings on the pavement as well as on appropriately located signs. Runway markings are white; taxiway markings are yellow. As you approach the runway, you will see a large number near the threshold that indicates the magnetic direction you are facing when looking down the runway, in degrees divided by 10. Sometimes the runway identifier will include a letter "R", "L", or "C" to distinguish between parallel runways.
Other markings may precede the threshold. White arrows denote a displaced threshold. That surface is OK for takeoff and taxiing, but not for landing (except from the opposite direction). It is likely there to enhance noise abatement from landing airplanes. You won't be making a lot of noise, but land beyond the threshold, anyway. You may also see yellow chevrons as shown in the illustration. They are used to show pavement areas aligned with the runway that are unusable for landing, takeoff, and taxiing. They could be considered a "stopway", an area aligned with the runway for deceleration during an aborted takeoff.
|
 "For runways and taxiways which are permanently closed, the lighting circuits will be disconnected. The runway threshold, runway designation, and touchdown markings are obliterated and yellow crosses are placed at each end of the runway and at 1,000 foot intervals."(4)
|
VISUAL APPROACH SLOPE INDICATORS
As you approach the runway you may see one of the following Visual Approach Slope Indicators (VASI). They provide a visual clue as to how well you are maintaining the preferred final approach path in a vertical sense. You'll have to use the runway itself for lateral guidance. VASIs provide safe obstruction clearance within plus or minus 10 degrees of the extended runway centerline and to 4 NM from the runway threshold.
"An airplane approaching to land on a runway served by a visual approach slope indicator shall maintain an altitude at or above the glide slope until a lower altitude is necessary for safe landing."
(1)

TWO BAR VASI
|

THREE BAR VASI
|

PRECISION APPROACH PATH INDICATOR (PAPI)
|

PULSATING VASI
|

TRI-COLOR VASI
|
SIGNS AND SURFACE MARKINGS
 If this sign is useful to a glider pilot, it is a sure indication of really bad landing accuracy training. It indicates the amount of runway remaining in thousands of feet.
|
 If you want to establish good relations with the controllers, be sure to pass this sign when leaving the runway. In fact, you are not "clear of the runway" until all of your aircraft is past the corresponding pavement marking in the next illustration.
|
 Similarly, you must not cross the hold line on departure until cleared to do so by the tower. If you have trouble remembering which side of the line is which, try to relate it to highway markings. If the solid line is on your side, you must not cross (without a clearance in this case).
|
 The glider pilot likely will not encounter this sign in landing. "This sign prohibits an aircraft from entering an area. Typically, this sign would be located on a taxiway intended to be used in only one direction or at the intersection of vehicle roadways with runways, taxiways or aprons where the roadway may be mistaken as a taxiway."(4) It may be appropriate to use the road if the glider is on its trailer, but maybe you should check with ground control just to be sure.
Other indicators of where aircraft and other vehicle operations converge may be
marked on the surface as shown here to the right. Vehicle roadways are marked in white.
The glider pilot likely will not encounter this sign in landing. "This sign prohibits an aircraft from entering an area. Typically, this sign would be located on a taxiway intended to be used in only one direction or at the intersection of vehicle roadways with runways, taxiways or aprons where the roadway may be mistaken as a taxiway."(4) It may be appropriate to use the road if the glider is on its trailer, but maybe you should check with ground control just to be sure.
Other indicators of where aircraft and other vehicle operations converge may be
marked on the surface as shown here to the right. Vehicle roadways are marked in white.
|

|
Airport markings on the pavement assume black paving and are so illustrated. Black backgrounds are used for markings that show where you are. Yellow and red backgrounds indicate what is ahead. If it is red you need a clearance to go there. Runways are always indicated by a number (e.g. "25"). Taxiways are always indicated by a letter (e.g. "C"), and sometimes a letter and a number (e.g. "C9").
 This sign indicates you are about to enter runway 15-33. If you were at one end of the runway the sign would show only 15 or 33. There would also be a pavement marking of a hold line that you should not cross without a clearance.
|
 This sign is equivalent to the runway hold sign except that it applies to a point where the taxiway crosses the extended runway line, not the runway itself. Your glider probably doesn't stick up high enough to interfere with an aircraft on approach to the runway, but wait for a clearance anyway.
|
 This could be a sign or a pavement marking. Because the background is black, you know it is telling you where you are. In this case you are on taxiway "T".
|
 Another black background indicates your current position, and because it is a number, "15", you know you are on a runway. One would hope that you already knew you were on a runway because you needed a clearance to get there, but it may be reassuring to know that you are on the runway to which you were cleared.
|
 This sign tells you that the runway exit you are approaching is to taxiway "A". Short taxiways connecting the runway with a parallel taxiway may be identified by a letter and a number, such as "A9". At a busy airport, the ground controller will want to know where you are when you call after the tower advises you to contact "ground". In this example, try to remember "Alpha nine", because you may not be able to see other identifiers after you exit the runway.
|
 This sign tells you that the taxiway to your left will take you to runway 5. If you go straight ahead, you will end up at runway 13. The yellow background indicates that the sign is telling you what is ahead. If the runway was immediately ahead, the background would be red.
|
© 2005 Jim D. Burch 602-942-2734
jdburch@att.net
To return to table of contents select TOC